This is your “Mission Control.” The Dashboard gives you a bird’s-eye view of everything happening across all campuses. You don’t take actions here; instead, you monitor the health and performance of the university.
This screen is divided into several “cards” (blocks of information). Here’s how to read and interact with them:
Step 1: View the Date Range
Look at the top right corner. You will see a date range (e.g., 01/01/2026 to 12/31/2026).
This is the filter for the data you are seeing. To change it, click on the date box and select a different start and end date. This will refresh all the data on the dashboard.
Step 2: Read the Quick Stats (Top Cards) These are the big, number-based cards at the top:
Campus Onboarding / Offboarding: Check these numbers to see how many new campuses are being added or closed.
Enrollments, Drop-outs, Pass-outs: These numbers show the student lifecycle. Monitor these to see if student numbers are growing.
Users Onboarding & Offboarding: This tracks staff and faculty movement.
Total Active Students & Teacher:Student Ratio: These are critical metrics to ensure your campuses are balanced and staffed correctly.
Step 3: Analyze the Charts
Look for the graphical charts (like the bar charts for “Curriculum Completion Rate” and “Teacher Attendance”).
Hover your mouse over any bar or line in the chart to see the exact numbers for that month or category.
Step 4: View Detailed Tables
Look at the tables like “Daily Class Schedule” and “Fee Received vs Receivable.”
These list specific data. For example, the class schedule will show you which classes are happening, at what time, and with which teacher.
Step 5: Click “View more details”
On the bottom right of every card (like the graph or the class schedule), you will see a blue link that says “View more details”.
Action: Clicking this link will take you to a dedicated, full-page report where you can see more detailed data, apply filters, or export the information.
What to do next?
If you are just checking in: Review the numbers. If you see a red flag (e.g., high drop-outs or low attendance), click the “View more details” link on that specific card to investigate further.
If you want to manage the system: You will not do it from here. Look at the blue sidebar on the left. To add a new faculty or user, click “User Management” or “Create Faculties.” This dashboard is only for viewing data, not for editing it.
Once you are done reviewing the numbers, use the blue sidebar on the left to navigate to your next task.
Note: If the data on a card says “No data available,” it simply means there is no information for that category in the selected date range.
This screen helps you manage all the user roles in the system. A “Role” is like a job title (e.g., Principal, Teacher, Exams Officer). Each role has specific permissions that decide what that person can see and do. You can create new roles, edit existing ones, or delete roles that are no longer needed.
Step-by-Step Guide (How to Use This Screen)
Step 1: Find a Specific Role (Search)
At the top right of the table, you will see a “Search” box.
Action: Type the name of a role (e.g., “Principal”) into this box and press Enter. The table will automatically filter to show only that role.
Step 2: Change How Many Roles You See
Next to the Search box, you will see a dropdown that says “Show Entries: 10”.
Action: Click this dropdown and select a number (e.g., 25, 50, or 100). This controls how many roles are displayed on one page.
Step 3: View the Role List
The main table shows you all the roles in the system:
Sr. No.: The serial number of the role.
Role: The name of the role (e.g., “ICT Admin”, “Dean”).
Date of Creation: The date when this role was created in the system.
Action: This is where you manage each role. You will see icons or buttons here.
Step 4: Manage a Specific Role (The “Action” Column)
To manage a role, look at the “Action” column and click the appropriate option:
Configure Permissions
What it does: This is the most important action. It lets you decide exactly what this role can see and do.
Action: Click the “Configure Permissions” button/link.
What happens next: A new screen will open showing a list of all menus (like Dashboard, Fees, Exams). You will check or uncheck boxes to give or remove access. For example, you can give the “Dean” role access to “Reports” but block access to “Fees.”
Update Role
What it does: This lets you change the name of the role.
Action: Click the “Update Role” button/link.
What happens next: A pop-up or new page will appear where you can type a new name for the role. Click “Save” to confirm.
Soft Delete
What it does: This hides the role from the main list. The role is not permanently removed; it’s just “deactivated” and can be restored later if needed.
Action: Click the “Soft Delete” button/link.
What happens next: A confirmation message will pop up. Click “Yes” to confirm. The role will disappear from your list but remains in the system’s database.
Hard Delete
What it does: This permanently removes the role from the system. Warning: This action cannot be undone.
Action: Click the “Hard Delete” button/link.
What happens next: A confirmation message will pop up warning you that this is permanent. Click “Yes” only if you are absolutely sure. The role is deleted forever.
What to do next?
If you configured permissions: After saving the permissions, you are usually redirected back to this Roles list. The role is now updated with its new access rights.
If you updated a role name: You will see the new name reflected in the list.
If you want to add a brand new role: Look for an “Add Role” or “Create Role” button (usually at the top of the page). Click it to create a new role from scratch.
Remember: Never delete a role if users are already assigned to it. It is safer to use “Soft Delete” so you can restore it later if needed.
User Guide: All Users
1. Purpose of this Screen
This screen displays a complete list of all users registered in the evERP system. From here, you can view user details, edit information, change status, or delete users. It acts as your central directory for managing everyone in the system.
2. Step-by-Step Guide (How to Use This Screen)
Step 1: Find a Specific User (Search)
At the top right of the table, you will see a “Search” box.
Action: Type any keyword (like a name, email, or role) into this box and press Enter. The table will automatically filter to show only matching users.
Step 2: Change How Many Users You See
Next to the Search box, you will see a dropdown that says “Show Entries: 10”.
Action: Click this dropdown and select a number (e.g., 25, 50, or 100). This controls how many users are displayed on one page.
Step 3: View the User List
The main table shows you all users in the system with the following columns:
Sr. No.: The serial number of the user.
Full Name: The user’s complete name.
Father’s Name: The user’s father’s name.
Role: The role assigned to the user (e.g., ICT Admin, Teacher, Exams, Alumni).
Mobile No.: The user’s contact number.
Email: The user’s email address (also used for login).
Status: Shows whether the user is Active or Inactive.
Action: This column contains buttons to manage each user.
Step 4: Manage a Specific User (The “Action” Column)
To manage a user, look at the “Action” column and click the appropriate option:
View User
What it does: Allows you to see all details of a user without making any changes.
Action: Click the “View User” button/link.
What happens next: A new screen or pop-up will open showing complete user information.
Update User
What it does: Allows you to edit the user’s information (e.g., change name, mobile number, role, or password).
Action: Click the “Update User” button/link.
What happens next: You will be taken to an edit form where you can make changes. Click “Save” or “Update” to confirm.
Soft Delete
What it does: This hides the user from the main list. The user is not permanently removed; they are just “deactivated” and can be restored later if needed.
Action: Click the “Soft Delete” button/link.
What happens next: A confirmation message will pop up. Click “Yes” to confirm. The user will disappear from your list but remains in the system’s database.
Hard Delete
What it does: This permanently removes the user from the system. Warning: This action cannot be undone.
Action: Click the “Hard Delete” button/link.
What happens next: A confirmation message will pop up warning you that this is permanent. Click “Yes” only if you are absolutely sure. The user is deleted forever.
3. Other Options on this Screen
Add User
Click the “Add User” button at the top of the page.
What happens next: You will be redirected to the “Add User” form where you can register a new user.
Export to Excel
Click the “Export to Excel” button to download a spreadsheet of all users.
This is useful for offline record-keeping, reporting, or creating backups.
Pagination
At the bottom of the table, you will see page navigation (e.g., “< Go to Page 1”).
Action: Click on the page numbers or arrows to navigate between pages if you have many users.
4. What to do next?
If you viewed or updated a user: You will be redirected back to this All Users list. The changes will be reflected immediately.
If you soft deleted a user: The user is now inactive. To restore them, you may need to go to a “Trash” or “Deleted Users” section (if available) or contact your system administrator.
If you want to add a new user: Click the “Add User” button and fill in the form.
Tip: Use the “Search” feature to quickly find a specific user instead of scrolling through the entire list. This saves time, especially when you have hundreds of users in the system.
User Guide: Students Management
1. Purpose of this Screen
This screen allows you to manage all students in the evERP system. From here, you can view the complete student list, filter students by faculty and program, search for specific students, and take various actions on individual student records including viewing, updating, or deleting student information.
2. Student List – How to Use
Step 1: Filter Students by Faculty and Program
At the top of the page, you will see two dropdown filters:
Select Faculty: Click this dropdown and choose a faculty (e.g., Science, Arts, Engineering) to view only students belonging to that faculty.
Select Program: Click this dropdown and choose a specific program (e.g., BSCS, BBA, BSIT) to view only students enrolled in that program.
Refresh Filter: After selecting your filters, click the “Refresh Filter” button to update the student list.
Step 2: Find a Specific Student (Search)
At the top right of the table, you will see a “Search” box.
Action: Type any keyword (like a name, roll number, or email) into this box and press Enter. The table will automatically filter to show only matching students.
Step 3: Change How Many Students You See
Next to the Search box, you will see a dropdown that says “Show Entries: 10”.
Action: Click this dropdown and select a number (e.g., 25, 50, or 100). This controls how many students are displayed on one page.
Step 4: View the Student List
The main table shows you all students with the following columns:
Sr. No.: The serial number of the student.
Full Name: The student’s complete name.
Roll No: The student’s unique roll number assigned by the system.
Mobile No.: The student’s contact number.
Email: The student’s email address (also used for login).
Status: Shows whether the student is Active or Inactive.
Action: This column contains four buttons to manage each student.
5. Student Action Buttons (The “Action” Column)
To manage a student, look at the “Action” column where you will find four options:
View Student
What it does: Allows you to see all details of a student without making any changes.
Action: Click the “View Student” button/link.
What happens next: A new screen will open showing complete student information including personal details, academic record, and fees status in read-only mode.
Update Student
What it does: Allows you to edit the student’s complete information. This opens a detailed screen with three sub-tabs.
Action: Click the “Update Student” button/link.
What happens next: The Update Student screen will open with three tabs: Student Info, Fees, and Student Requests. (Detailed guide below).
Soft Delete
What it does: This hides the student from the main list. The student is not permanently removed; they are just “deactivated” and can be restored later if needed.
Action: Click the “Soft Delete” button/link.
What happens next: A confirmation message will pop up. Click “Yes” to confirm. The student will disappear from your list but remains in the system’s database.
Hard Delete
What it does: This permanently removes the student from the system. Warning: This action cannot be undone.
Action: Click the “Hard Delete” button/link.
What happens next: A confirmation message will pop up warning you that this is permanent. Click “Yes” only if you are absolutely sure. The student is deleted forever.
6. View Student – Complete Guide
When you click “View Student”, you will be taken to a detailed screen with three tabs. Here is how each tab works:
Tab 1: Student Info
Purpose
This tab displays the student’s complete personal and academic information. From here, you can view all details and make updates to the student’s record.
Step-by-Step Guide
Step 1: View Personal Information
The top section shows the student’s personal details including:
Full Name: Student’s complete name.
Father’s Name: Student’s father name.
Father’s CNIC: Father’s CNIC number.
Date of Birth: Student’s date of birth.
Gender: Male, Female, or Other.
Nationality: Student’s nationality.
Religion: Student’s religion.
Marital Status: Single, Married, etc.
Blood Group: Student’s blood group.
Passport: Passport number (if applicable).
Step 2: View Contact Information
The middle section shows the student’s contact details including:
Mobile No.: Student’s mobile phone number.
Email: Student’s email address (also used for login).
Landline: Student’s landline number (if available).
Address: Student’s complete residential address.
Step 3: View Academic Information
The bottom section shows the student’s academic details including:
Roll No.: Student’s unique roll number.
Faculty: The faculty the student belongs to.
Program: The program the student is enrolled in.
Semester: Current semester of the student.
Campus: The campus where the student is enrolled.
Session: Academic session (e.g., 2024-2028).
Status: Active or Inactive.
Step 4: Update Student Information
To make changes to any field, simply click inside the field and type the new information.
Fields marked with * (asterisk) are mandatory.
Action: After making all changes, scroll to the bottom and click the “Update” or “Save Changes” button.
What happens next: The evERP system will save the changes and show a success message. The student’s record is now updated.
Step 5: Upload Profile Picture
To change the student’s profile picture:
Action: Click the “Choose File” button and select a new image from your computer.
What happens next: Click “Upload” or “Save” to update the profile picture.
Tab 2: Fees
Purpose
This tab shows the complete fee record for the student. From here, you can view all fees charged, check payment status, download challans, track arrears, and add new fees.
Understanding the Fee Summary
At the bottom of the fees section, you will see three key financial figures:
Net Fees Receivable (PKR): The total amount of fees that have been charged to the student.
Fees Received (PKR): The total amount that the student has paid so far.
Fees Outstanding (PKR): The remaining amount that the student still needs to pay. (This is calculated as: Net Fees Receivable – Fees Received).
Step-by-Step Guide
Step 1: View the Fee List
The fee table shows you all fees charged to the student with the following columns:
Sr. No.: The serial number of the fee entry.
Fees: The type of fee (e.g., Admission, Exam Fee, Tuition Fees).
Due Date: The date by which the fee must be paid.
Amount: The fee amount in Pakistani Rupees (PKR).
Fee Status: Shows whether the fee is Paid or Unpaid.
Fee Challan: Click “Download” to download the challan form for this fee.
Paid Challan: Click “View” to see the paid challan (only available after payment).
Comments: Any additional notes or remarks about this fee.
Arrears: Shows if there are any outstanding/delayed payments for this fee.
Action: Contains buttons to manage individual fee entries.
Step 2: Download a Fee Challan
Look at the “Fee Challan” column for the fee you want to generate.
Action: Click the “Download” button.
What happens next: A PDF file of the challan will be downloaded to your computer. You can print this and give it to the student to make payment at the bank.
Step 3: View a Paid Challan
If a fee has been paid, the “Paid Challan” column will show a “View” button.
Action: Click the “View” button.
What happens next: The paid challan receipt will open for you to review or print.
Step 4: Add New Fees
To charge a new fee to the student, look for the “Add New Fees” button (usually at the top right of the table).
Action: Click the “Add New Fees” button.
What happens next: A form will open where you can select the fee type, enter the amount, set a due date, and add any comments. Click “Save” to add the fee to the student’s record.
Tab 3: Student Requests
Purpose
This tab displays all requests submitted by the student to various departments. From here, you can view, approve, reject, or process student requests.
Step-by-Step Guide
Step 1: View the Requests List
The requests table shows you all requests submitted by the student with the following columns:
Sr. No.: The serial number of the request.
Request Type: The type of request (e.g., Scholarship Application, Transfer Request, Fee Concession, Course Withdrawal).
Request Date: The date when the request was submitted.
Department: The department to which the request was sent (e.g., Admissions, Academics, Accounts).
Status: Shows the current status of the request (e.g., Pending, Approved, Rejected, In Progress).
Action: Contains buttons to manage each request.
Step 2: View Request Details
Action: Click the “View” button to see complete details of the request.
What happens next: A detailed view will open showing the student’s message, supporting documents (if any), and any comments from the department.
Step 3: Process a Request
To take action on a student request, look at the “Action” column.
Approve: Click the “Approve” button to approve the request.
Reject: Click the “Reject” button to reject the request.
What happens next: A confirmation dialog will appear. Click “Yes” to confirm. The request status will update, and the student will be notified of the decision.
Step 4: Add Comments to a Request
When viewing a request, you can add comments or notes.
Action: Type your comments in the text box and click “Add Comment” or “Save”.
What happens next: Your comment will be saved and visible to the student and other staff members.
Step 5: Filter Requests
At the top of the requests table, you will see filter options.
Action: Select filters like “Status” (Pending, Approved, Rejected) or “Request Type” to narrow down the list.
What happens next: The table will refresh to show only matching requests.
7. What to do next?
If you viewed a student: You will see all student details in read-only mode. Click “Back” or close the view to return to the student list.
If you updated student information: The changes will be reflected immediately. The student will see the updated information in their own portal.
If you soft deleted a student: The student is now inactive. To restore them, you may need to go to a “Trash” or “Deleted Students” section or contact your system administrator.
If you downloaded a challan: Print it and hand it over to the student for payment at the bank.
If you added new fees: The fee will appear in the list with status “Unpaid”. The student will now see this fee in their own portal.
If you processed a student request: The status will update, and the student will receive a notification about the decision.
If you want to go back to the student list: Use the sidebar navigation to go to “Students” or click the back button in your browser.
Tips:
1. Use the “Select Faculty” and “Select Program” filters first to narrow down your student list. This is especially helpful when your university has thousands of students across multiple programs.
2. Always check the “Fees Outstanding” amount to quickly understand how much the student still owes. If the student claims they have paid, check the “Paid Challan” column to verify the payment receipt.
3. Use the “Student Requests” tab to track all student applications in one place. This helps you manage requests efficiently and avoid delays.
4. When processing requests, always add comments explaining your decision. This creates a clear audit trail for future reference.
5. Use “Soft Delete” instead of “Hard Delete” whenever possible. Soft deleted students can be restored, but hard deleted students are gone forever.
User Guide: Dashboard Configuration
1. Purpose of this Screen
This screen allows you to configure and customize dashboards for different user roles in the evERP system. From here, you can assign which dashboard layout and widgets each role can see when they log in. This helps you provide role-specific views – for example, teachers see teaching-related widgets, while finance staff see financial dashboards.
2. Step-by-Step Guide (How to Use This Screen)
Step 1: Find a Specific Role (Search)
At the top right of the table, you will see a “Search” box.
Action: Type the name of a role (e.g., “Principal”) into this box and press Enter. The table will automatically filter to show only that role.
Step 2: Change How Many Roles You See
Next to the Search box, you will see a dropdown that says “Show Entries: 10”.
Action: Click this dropdown and select a number (e.g., 25, 50, or 100). This controls how many roles are displayed on one page.
Step 3: View the Role List
The main table shows you all roles in the system with the following columns:
Sr. No.: The serial number of the role.
Role: The name of the role (e.g., ICT Admin, Dean Humanities and Social Sciences, Principal).
Date of Creation: The date when this role was created in the system.
Action: This column contains the “Configure Dashboard” button to customize dashboards for each role.
4. Configuring a Dashboard for a Role
Step 1: Access Dashboard Configuration
Look at the “Action” column for the role you want to configure.
Action: Click the “Configure Dashboard” button/link.
What happens next: The dashboard configuration screen will open where you can customize what this role sees.
Step 2: Configure Dashboard Widgets
On the configuration screen, you will see options to:
Select Widgets: Choose which widgets (cards) appear on the dashboard. Widgets show different types of data like:
Quick Stats (Enrollments, Drop-outs, Pass-outs).
Charts and Graphs (Attendance, Fee Analysis).
Tables (Daily Class Schedule, Fee Summary).
Reports and Alerts.
Arrange Widgets: Drag and drop widgets to rearrange their position on the dashboard.
Set Defaults: Decide which widgets appear by default when the user logs in.
Step 3: Save Configuration
After making all changes, look for the “Save” or “Update” button.
Action: Click the button to save your dashboard configuration.
What happens next: The configuration is saved. The next time a user with this role logs in, they will see the customized dashboard you have designed.
Step 5: Lock Icon (🔒)
Some roles may show a lock icon (🔒) in the Action column.
What it means: This indicates that the dashboard configuration for this role is currently locked or restricted.
Action: You may need specific permissions to unlock and configure these roles. Contact your system administrator if you need to modify locked roles.
5. What to do next?
If you configured a dashboard: The new dashboard layout will be visible to users with that role when they log in.
If you want to configure another role: Go back to the Dashboard Configuration list and click “Configure Dashboard” for the next role.
If you want to manage other configurations: Use the sidebar to navigate to other configuration options like Campuses, Faculties, Programs, Courses, etc.
Tip: When configuring dashboards, think about what each role needs to see. For example:
– Principals may need overall performance metrics and reports.
– Teachers may need attendance tracking and class schedules.
– Finance Staff may need fee collection and revenue reports.
– Admission Officers may need enrollment statistics and application status.
User Guide: Campuses
1. Purpose of this Screen
This screen allows you to manage all campuses in the evERP system. From here, you can view, add, update, or delete campus information. Each campus represents a physical location where the university operates, and all students, faculty, and staff are associated with a specific campus.
2. Step-by-Step Guide (How to Use This Screen)
Step 1: Find a Specific Campus (Search)
At the top right of the table, you will see a “Search” box.
Action: Type any keyword (like campus name, code, or contact person) into this box and press Enter. The table will automatically filter to show only matching campuses.
Step 2: Change How Many Campuses You See
Next to the Search box, you will see a dropdown that says “Show Entries: 10”.
Action: Click this dropdown and select a number (e.g., 25, 50, or 100). This controls how many campuses are displayed on one page.
Step 3: View the Campus List
The main table shows you all campuses with the following columns:
Sr. No.: The serial number of the campus.
Campus Name: The full name of the campus (e.g., Islamabad Campus, Lahore Campus).
Campus Code: A unique short code for the campus (e.g., IC, LC01).
Contact Person: The name of the person responsible for this campus.
Mobile No.: The contact number for the campus.
Email: The official email address for the campus.
Action: This column contains buttons to manage each campus.
4. Managing a Campus (The “Action” Column)
To manage a campus, look at the “Action” column and click the appropriate option:
View
What it does: Allows you to see all details of a campus without making any changes.
Action: Click the “View” button/link.
What happens next: A new screen or pop-up will open showing complete campus information including address, facilities, and associated staff.
Update
What it does: Allows you to edit the campus information (e.g., change name, contact person, phone number, or email).
Action: Click the “Update” button/link.
What happens next: You will be taken to an edit form where you can make changes. Click “Save” or “Update” to confirm.
Soft Delete
What it does: This hides the campus from the main list. The campus is not permanently removed; it is just “deactivated” and can be restored later if needed.
Action: Click the “Soft Delete” button/link.
What happens next: A confirmation message will pop up. Click “Yes” to confirm. The campus will disappear from your list but remains in the system’s database.
Hard Delete
What it does: This permanently removes the campus from the system. Warning: This action cannot be undone.
Action: Click the “Hard Delete” button/link.
What happens next: A confirmation message will pop up warning you that this is permanent. Click “Yes” only if you are absolutely sure. The campus is deleted forever.
5. Adding a New Campus
Step 1: Click Add Campus
Look for the “Add Campus” button at the top of the page.
Action: Click the “Add Campus” button.
Step 2: Fill in Campus Details
A form will open where you need to enter:
Campus Name: Enter the full name of the campus.
Campus Code: Enter a unique short code for the campus.
Contact Person: Enter the name of the person responsible.
Mobile No.: Enter the contact number.
Email: Enter the official email address.
Address: Enter the complete physical address of the campus.
Step 3: Save the Campus
Action: After filling in all details, click the “Save” or “Add” button.
What happens next: The new campus will be saved and will appear in the campus list.
6. Exporting Campus Data
Click the “Export to Excel” button at the top of the page.
What happens next: A spreadsheet file will be downloaded containing all campus data. This is useful for offline record-keeping, reporting, or creating backups.
7. What to do next?
If you viewed or updated a campus: You will be redirected back to this Campuses list. The changes will be reflected immediately.
If you added a new campus: The new campus will appear in the list. You can now assign this campus to students, faculty, and programs.
If you soft deleted a campus: The campus is now inactive. To restore it, you may need to go to a “Trash” or “Deleted Campuses” section or contact your system administrator.
If you want to manage other configurations: Use the sidebar to navigate to other configuration options like Faculties, Programs, Courses, etc.
Tips:
1. Use unique and recognizable Campus Codes (e.g., ISB, LHR, KHI) for easy identification across the system.
2. Before deleting a campus, make sure no students, faculty, or staff are currently associated with it. Use “Soft Delete” first to be safe.
3. Keep contact information up to date so that communication with campus administration remains smooth.
User Guide: Taxonomies (Domains & Levels)
1. Purpose of this Screen
This screen allows you to manage taxonomies in the evERP system. Taxonomies are used to classify and organize learning objectives, domains, and levels for Outcome-Based Education (OBE). Think of these as categories or skills that help measure student learning outcomes. For example, Remember, Understand, Apply, Analyze, Evaluate, and Create are common taxonomy levels used in education.
2. Taxonomies Main Screen – How to Use
Step 1: Find a Specific Taxonomy (Search)
At the top right of the table, you will see a “Search” box.
Action: Type any keyword (like taxonomy name) into this box and press Enter. The table will automatically filter to show only matching taxonomies.
Step 2: Change How Many Taxonomies You See
Next to the Search box, you will see a dropdown that says “Show Entries: 10”.
Action: Click this dropdown and select a number (e.g., 25, 50, or 100). This controls how many taxonomies are displayed on one page.
Step 3: View the Taxonomy List
The main table shows you all taxonomies with the following columns:
Sr. No.: The serial number of the taxonomy.
Taxonomy Name: The name of the taxonomy (e.g., Remember, Understand, Apply, Analyze, Evaluate, Create).
Action: This column contains buttons to manage each taxonomy.
4. Adding a New Taxonomy
Step 1: Click Add Taxonomy
Look for the “Add Taxonomy” button at the top of the page.
Action: Click the “Add Taxonomy” button.
Step 2: Enter Taxonomy Details
A form will open where you need to enter:
Taxonomy Name: Enter the name of the taxonomy (e.g., “Remember”, “Apply”).
5. Add Domains & Levels Screen
Purpose
This screen allows you to create and manage domains with their associated levels. Domains represent broad areas of learning (e.g., Cognitive, Psychomotor, Affective), and levels represent the specific skills within each domain (e.g., Remember, Understand, Apply within the Cognitive domain).
Step-by-Step Guide
Step 1: Add a Domain
Look at the top section labeled “Domain Name”.
Action: Enter the name of the domain in the “Domain Name *” field (e.g., “Cognitive Domain”, “Psychomotor Domain”).
Step 2: Add Sequence Number
Action: In the “Sequence No *” field, enter a number to define the order of this domain (e.g., 1 for first domain, 2 for second domain).
What it does: This controls the display order of domains in the system.
Step 3: Add Levels to the Domain
In the “Level” section, you will see fields to add taxonomy levels.
Action: Enter the name of each level (e.g., “Remember”, “Understand”, “Apply”).
Action: In the “Objectives” field, enter the learning objectives for each level (optional).
Action: Click the “Add” button to add each level to the domain.
Step 4: Save Domain and Levels
After adding all levels to the domain, look for the “Add Domains & Levels” button at the bottom.
Action: Click the “Add Domains & Levels” button.
What happens next: The domain and all its levels will be saved. They will now appear in the main taxonomies list and can be used for OBE mapping.
Example of Adding Domains & Levels
Domain Name
Sequence No
Levels
Objectives
Cognitive Domain
1
Remember
Recall facts and basic concepts
Cognitive Domain
1
Understand
Explain ideas and concepts
Cognitive Domain
1
Apply
Use information in new situations
6. Exporting Taxonomy Data
Click the “Export to Excel” button at the bottom of the main taxonomy list.
What happens next: A spreadsheet file will be downloaded containing all taxonomy data. This is useful for offline record-keeping, reporting, or creating backups.
7. What to do next?
If you added a taxonomy: The new taxonomy will appear in the list. You can now use it for OBE mapping and CLO (Course Learning Outcomes) configuration.
If you added domains and levels: The domains and their levels will be available for mapping with Program Learning Outcomes (PLOs) and Course Learning Outcomes (CLOs).
If you want to manage other configurations: Use the sidebar to navigate to other configuration options like Campuses, Faculties, Programs, Courses, etc.
Tips:
1. Use standard taxonomy levels (Remember, Understand, Apply, Analyze, Evaluate, Create) as they are widely recognized in education and OBE frameworks.
2. The Sequence Number determines the order in which domains appear in reports and dropdowns. Number them logically (1, 2, 3, etc.).
3. Always add clear objectives for each level. This helps teachers understand what each level means when mapping CLOs.
4. Domains and levels are the foundation of OBE. Take time to set them up correctly before proceeding with other OBE configurations.
User Guide: Scholarships Management
1. Purpose of this Screen
This screen allows you to manage all scholarships offered by the university in the evERP system. From here, you can create new scholarships, assign them to specific degree programs, configure scholarship percentage slabs, and manage existing scholarships. This helps you automate scholarship allocations based on student merit and eligibility criteria.
2. Scholarships Main Screen – How to Use
Step 1: Find a Specific Scholarship (Search)
At the top right of the table, you will see a “Search” box.
Action: Type any keyword (like scholarship name or type) into this box and press Enter. The table will automatically filter to show only matching scholarships.
Step 2: Change How Many Scholarships You See
Next to the Search box, you will see a dropdown that says “Show Entries: 10”.
Action: Click this dropdown and select a number (e.g., 25, 50, or 100). This controls how many scholarships are displayed on one page.
Step 3: View the Scholarship List
The main table shows you all scholarships with the following columns:
Sr. No.: The serial number of the scholarship.
Type/Name: The name or type of scholarship (e.g., Merit Based, HEC Need Base Scholarship).
Semester Type: Indicates when the scholarship applies (e.g., Whole Degree, First Semester, Other Than First).
Action: This column contains buttons to manage each scholarship.
4. Managing a Scholarship (The “Action” Column)
To manage a scholarship, look at the “Action” column and click the appropriate option:
Assign Degrees
What it does: Allows you to assign this scholarship to specific degree programs.
Action: Click the “Assign Degrees” button/link.
What happens next: The Assign Degrees screen will open where you can select which degree programs are eligible for this scholarship.
Configure
What it does: Allows you to configure the scholarship percentage slabs based on student grades.
Action: Click the “Configure” button/link.
What happens next: The configuration screen will open where you can set percentage ranges and corresponding scholarship percentages.
Update
What it does: Allows you to edit the scholarship information (e.g., change name, semester type).
Action: Click the “Update” button/link.
What happens next: You will be taken to an edit form where you can make changes. Click “Save” to confirm.
Soft Delete
What it does: This hides the scholarship from the main list. The scholarship is not permanently removed; it is just “deactivated” and can be restored later if needed.
Action: Click the “Soft Delete” button/link.
What happens next: A confirmation message will pop up. Click “Yes” to confirm.
Hard Delete
What it does: This permanently removes the scholarship from the system. Warning: This action cannot be undone.
Action: Click the “Hard Delete” button/link.
What happens next: A confirmation message will pop up warning you that this is permanent. Click “Yes” only if you are absolutely sure.
5. Adding a New Scholarship
Step 1: Click Add Scholarship
Look for the “Add Scholarship” button at the top of the page.
Action: Click the “Add Scholarship” button.
Step 2: Fill in Scholarship Details
A form will open where you need to enter:
Type/Name *: Enter the name or type of scholarship (e.g., “Merit Based”, “Need Based”).
Semester Type: Select from the dropdown when the scholarship applies:
Whole Degree: Scholarship applies for the entire degree program.
First: Scholarship applies only for the first semester.
Other Than First: Scholarship applies from second semester onwards.
Step 3: Save the Scholarship
Action: After filling in all details, click the “Save” or “Add” button.
What happens next: The new scholarship will be saved and will appear in the scholarship list.
6. Assign Degrees to Scholarship
Purpose
This screen allows you to assign degree programs that are eligible for a specific scholarship.
Step-by-Step Guide
Step 1: Select Faculty
At the top, you will see a dropdown labeled “Faculty”.
Action: Select a faculty from the dropdown to filter degree programs.
Step 2: Select Degree Name
Next to the Faculty dropdown, you will see a field labeled “Degree Name”.
Action: Select a degree from the dropdown (e.g., “Bachelors of Science in Computer Science”).
Step 3: Assign Degree
Action: Click the “Assign” or “Add” button next to the degree name.
What happens next: The degree will appear in the assigned list below.
Step 4: View Assigned Degrees
The table shows all degrees assigned to this scholarship:
Sr. No.: Serial number.
Degree: The name of the assigned degree.
Action: Click “Unassign” to remove a degree from this scholarship.
7. Configure Scholarship Percentages
Purpose
This screen allows you to set scholarship percentage slabs based on student grade ranges. For example, students with 90%+ marks get 90% scholarship, students with 80-89% get 70% scholarship, etc.
Step-by-Step Guide
Step 1: Add Percentage Slab
Look at the configuration table where you can add percentage ranges.
Action: Enter the “Starting (%)” and “Ending (%)” range.
Action: Enter the “Scholarship (%)” to be awarded to students in this range.
Action: Click the “Add” or “Save” button to add this slab.
Step 2: View Existing Slabs
The table shows all configured percentage slabs:
Sr. No.: Serial number.
Starting (%): The minimum percentage for this slab.
Ending (%): The maximum percentage for this slab.
Scholarship (%): The scholarship percentage awarded.
Action: Click “Delete” to remove a slab.
Example Configuration
Starting (%)
Ending (%)
Scholarship (%)
90%
100%
90%
80%
89%
70%
70%
79%
50%
8. Exporting Scholarship Data
Click the “Export to Excel” button at the bottom of any scholarship table.
What happens next: A spreadsheet file will be downloaded containing all scholarship data.
9. What to do next?
If you added a new scholarship: The scholarship will appear in the list. You can now assign degrees and configure percentage slabs.
If you assigned degrees: The selected degree programs are now eligible for this scholarship.
If you configured percentage slabs: The scholarship will be automatically calculated based on student grades during fee processing.
If you want to manage other configurations: Use the sidebar to navigate to other configuration options like Campuses, Faculties, Programs, Courses, etc.
Tips:
1. Always assign degrees after creating a scholarship, otherwise students won’t be able to apply for it.
2. Configure percentage slabs carefully. The system will automatically apply scholarship percentages based on student grades.
3. Use “Whole Degree” for scholarships that apply for the entire program, and “First” or “Other Than First” for semester-specific scholarships.
4. Test your scholarship configuration with sample student data to ensure percentages are being calculated correctly.
User Guide: Course Categories
1. Purpose of this Screen
This screen allows you to manage course categories in the evERP system. Course categories help you classify and organize courses based on their nature, type, and degree requirements. For example, courses can be categorized as General Education (Mandatory), Electives, Capstone Project, Major/Disciplinary, Interdisciplinary, Internship, or Non-Credit courses. Proper categorization helps with degree planning, graduation audits, and curriculum management.
2. Course Categories Main Screen – How to Use
Step 1: Find a Specific Course Category (Search)
At the top right of the table, you will see a “Search” box.
Action: Type any keyword (like category name or code) into this box and press Enter. The table will automatically filter to show only matching categories.
Step 2: Change How Many Categories You See
Next to the Search box, you will see a dropdown that says “Show Entries: 10”.
Action: Click this dropdown and select a number (e.g., 25, 50, or 100). This controls how many categories are displayed on one page.
Step 3: View the Course Category List
The main table shows you all course categories with the following columns:
Sr. No.: The serial number of the category.
Course Category Name: The name of the category (e.g., General Education (Mandatory), Electives, Capstone Project).
Course Category Code: A unique code for the category (e.g., 16, 7, 0, ISL 107).
Action: This column contains the Update button to edit each category.
4. Adding a New Course Category
Step 1: Access Add Course Category Screen
Look for the “Add Course Category” button at the top of the page.
Action: Click the “Add Course Category” button.
Step 2: Select Degree Level
In the form, look for the “Degree Level” dropdown.
Action: Select the appropriate degree level (e.g., Undergraduate, Graduate, Postgraduate) from the dropdown.
Step 3: Select Semester
Look for the “Semester” dropdown.
Action: Select the semester to which this category applies (e.g., 1st Semester, 2nd Semester, All Semesters).
Step 4: Select Nature
Look for the “Nature” dropdown.
Action: Select the nature of courses in this category (e.g., Mandatory, Elective, Core).
Step 5: Enter Category Details
Fill in the following required fields:
Category Name *: Enter the name of the course category (e.g., “General Education (Mandatory)”, “Electives”).
Course Code *: Enter a unique code for the category (e.g., “GEN101”, “ELEC”).
Color Code (HEX) *: Enter a hex color code (e.g., #FF5733) to visually identify this category in reports and dashboards.
Step 6: Graduation Audit Settings
Look for the “Graduation Audit” section.
Action: Configure how this category is treated in graduation audits (e.g., mandatory courses, credit requirements).
Step 7: Save the Course Category
Action: After filling in all details, click the “Add Course Category” button at the bottom.
What happens next: The new course category will be saved and will appear in the main course categories list.
5. Updating a Course Category
Step 1: Access Update Screen
In the main course categories list, look at the “Action” column.
Action: Click the “Update” button (🟢) for the category you want to edit.
Step 2: Make Changes
The update form will open with all existing details pre-filled.
Action: Make any necessary changes to the fields (Name, Code, Color, Nature, etc.).
Step 3: Save Changes
Action: Click the “Save” or “Update” button.
What happens next: The changes will be saved and reflected in the main list.
6. Common Course Category Examples
Category Name
Category Code
Nature
Description
General Education (Mandatory)
16
Mandatory
Core courses required for all students
Electives
7
Elective
Optional courses students can choose
Capstone Project (Mandatory)
0
Mandatory
Final year project required for graduation
Major/Disciplinary (Mandatory)
21
Mandatory
Core courses specific to the major
Non Credit courses Tajweed Seerah I & II
ISL 107
Non-Credit
Non-credit religious education courses
Fehm ul Quran
ISL 203
Non-Credit
Understanding the Quran course
7. What to do next?
If you added a new course category: The category will appear in the list. You can now assign courses to this category.
If you updated a course category: The changes will be reflected immediately in all reports and course listings.
If you want to manage other configurations: Use the sidebar to navigate to other configuration options like Faculties, Programs, Courses, etc.
Tips:
1. Use clear and descriptive names for course categories so that students and faculty can easily understand them.
2. Color codes help visually identify categories in reports and academic planning tools. Use distinct colors for different categories.
3. Proper course categorization is essential for:
– Graduation Audits: The system uses categories to check if students have completed all requirements.
– Degree Planning: Students can see which categories they need to complete.
– Curriculum Management: Administrators can track course distribution across categories.
4. For non-credit courses, make sure the “Nature” is set correctly so they don’t affect GPA calculations.
User Guide: Faculties Management
1. Purpose of this Screen
This screen allows you to manage all faculties in the evERP system. Faculties are academic divisions within the university (e.g., Faculty of Humanities & Social Sciences, Faculty of Sciences, Faculty of Engineering). From here, you can create new faculties, update existing ones, assign users to faculties, and manage faculty records.
2. Faculties Main Screen – How to Use
Step 1: Find a Specific Faculty (Search)
At the top right of the table, you will see a “Search” box.
Action: Type any keyword (like faculty name) into this box and press Enter. The table will automatically filter to show only matching faculties.
Step 2: Change How Many Faculties You See
Next to the Search box, you will see a dropdown that says “Show Entries: 10”.
Action: Click this dropdown and select a number (e.g., 25, 50, or 100). This controls how many faculties are displayed on one page.
Step 3: View the Faculty List
The main table shows you all faculties with the following columns:
Sr. No.: The serial number of the faculty.
Name: The name of the faculty (e.g., Faculty of Humanities & Social Sciences).
Action: This column contains buttons to manage each faculty.
4. Managing a Faculty (The “Action” Column)
To manage a faculty, look at the “Action” column and click the appropriate option:
Update Faculty
What it does: Allows you to edit the faculty information (e.g., change name, description, or head of faculty).
Action: Click the “Update Faculty” button/link.
What happens next: You will be taken to an edit form where you can make changes. Click “Save” or “Update” to confirm.
Assign to User
What it does: Allows you to assign faculty members to this faculty (e.g., assign teachers, department heads, or deans).
Action: Click the “Assign to User” button/link.
What happens next: The Assign Faculties to Users screen will open where you can assign users to this faculty.
Soft Delete
What it does: This hides the faculty from the main list. The faculty is not permanently removed; it is just “deactivated” and can be restored later if needed.
Action: Click the “Soft Delete” button/link.
What happens next: A confirmation message will pop up. Click “Yes” to confirm.
Hard Delete
What it does: This permanently removes the faculty from the system. Warning: This action cannot be undone.
Action: Click the “Hard Delete” button/link.
What happens next: A confirmation message will pop up warning you that this is permanent. Click “Yes” only if you are absolutely sure.
5. Adding a New Faculty
Step 1: Click Add Faculty
Look for the “Add Faculty” button at the top of the page.
Action: Click the “Add Faculty” button.
Step 2: Fill in Faculty Details
A form will open where you need to enter:
Faculty Name *: Enter the full name of the faculty (e.g., “Faculty of Humanities & Social Sciences”).
Description: Enter a brief description of the faculty (optional).
Dean/Head: Select the Dean or Head of this faculty from the dropdown (optional).
Step 3: Save the Faculty
Action: After filling in all details, click the “Save” or “Add” button.
What happens next: The new faculty will be saved and will appear in the faculty list.
6. Assign Faculties to Users
Purpose
This screen allows you to assign faculty members to specific faculties. For example, you can assign a teacher to the “Faculty of Humanities & Social Sciences” so they are associated with that academic division.
Step-by-Step Guide
Step 1: View the User List
The table shows you all users who can be assigned to a faculty:
No.: The serial number of the user.
Full Name: The complete name of the user.
Father’s Name: The user’s father’s name.
Role: The role assigned to the user (e.g., ICT Admin, Teacher, Exams, Alumni).
Status: Shows whether the user is Active or Inactive.
Action: Click “Assign” to assign this user to the current faculty.
Step 2: Assign a User to Faculty
Look at the “Action” column for the user you want to assign.
Action: Click the “Assign” button.
What happens next: A confirmation will appear. Click “Yes” to confirm. The user will now be associated with this faculty.
Step 3: Unassign a User
If a user is already assigned to the faculty, the action button may show “Unassign”.
Action: Click “Unassign” to remove the user from this faculty.
Step 4: Export User Data
Click the “Export to Excel” button to download the user list for offline record-keeping.
7. Exporting Faculty Data
Click the “Export to Excel” button at the bottom of the main faculty list.
What happens next: A spreadsheet file will be downloaded containing all faculty data.
8. What to do next?
If you added a new faculty: The new faculty will appear in the list. You can now assign programs, courses, and users to this faculty.
If you updated a faculty: The changes will be reflected immediately in all reports and listings.
If you assigned users to a faculty: The users will now be associated with that faculty and will have appropriate access.
If you want to manage other configurations: Use the sidebar to navigate to other configuration options like Programs, Courses, Campuses, etc.
Tips:
1. Faculties are the top-level academic divisions in your university. Organize them logically based on your university structure.
2. Always assign users (Deans, Department Heads, Teachers) to their respective faculties so they can access appropriate courses and data.
3. Before deleting a faculty, make sure no programs, courses, or users are associated with it. Use “Soft Delete” first to be safe.
4. Use the “Assign to User” feature to quickly manage faculty membership for multiple users at once.
User Guide: Programs / Degrees Management
1. Purpose of this Screen
This screen allows you to manage all academic programs and degrees offered by the university in the evERP system. From here, you can create new programs, view existing ones, update program details, manage student lists, define Program Objectives (POs), and set up Tentative Study Plans. Programs are the core academic offerings like BSIT, BSCS, BBA, etc.
2. Programs/Degrees Main Screen – How to Use
Step 1: Filter by Faculty
At the top of the page, you will see a “Select Faculty” dropdown.
Action: Choose a faculty from the dropdown to view only programs belonging to that faculty.
Action: Click the “Refresh Filters” button to update the program list.
Step 2: Find a Specific Program (Search)
At the top right of the table, you will see a “Search Program” box.
Action: Type any keyword (like program name or code) into this box and press Enter. The table will automatically filter to show only matching programs.
Step 3: Change How Many Programs You See
Next to the Search box, you will see a dropdown that says “Show Entries: 10”.
Action: Click this dropdown and select a number (e.g., 25, 50, or 100). This controls how many programs are displayed on one page.
Step 4: View the Program List
The main table shows you all programs with the following columns:
Sr. No.: The serial number of the program.
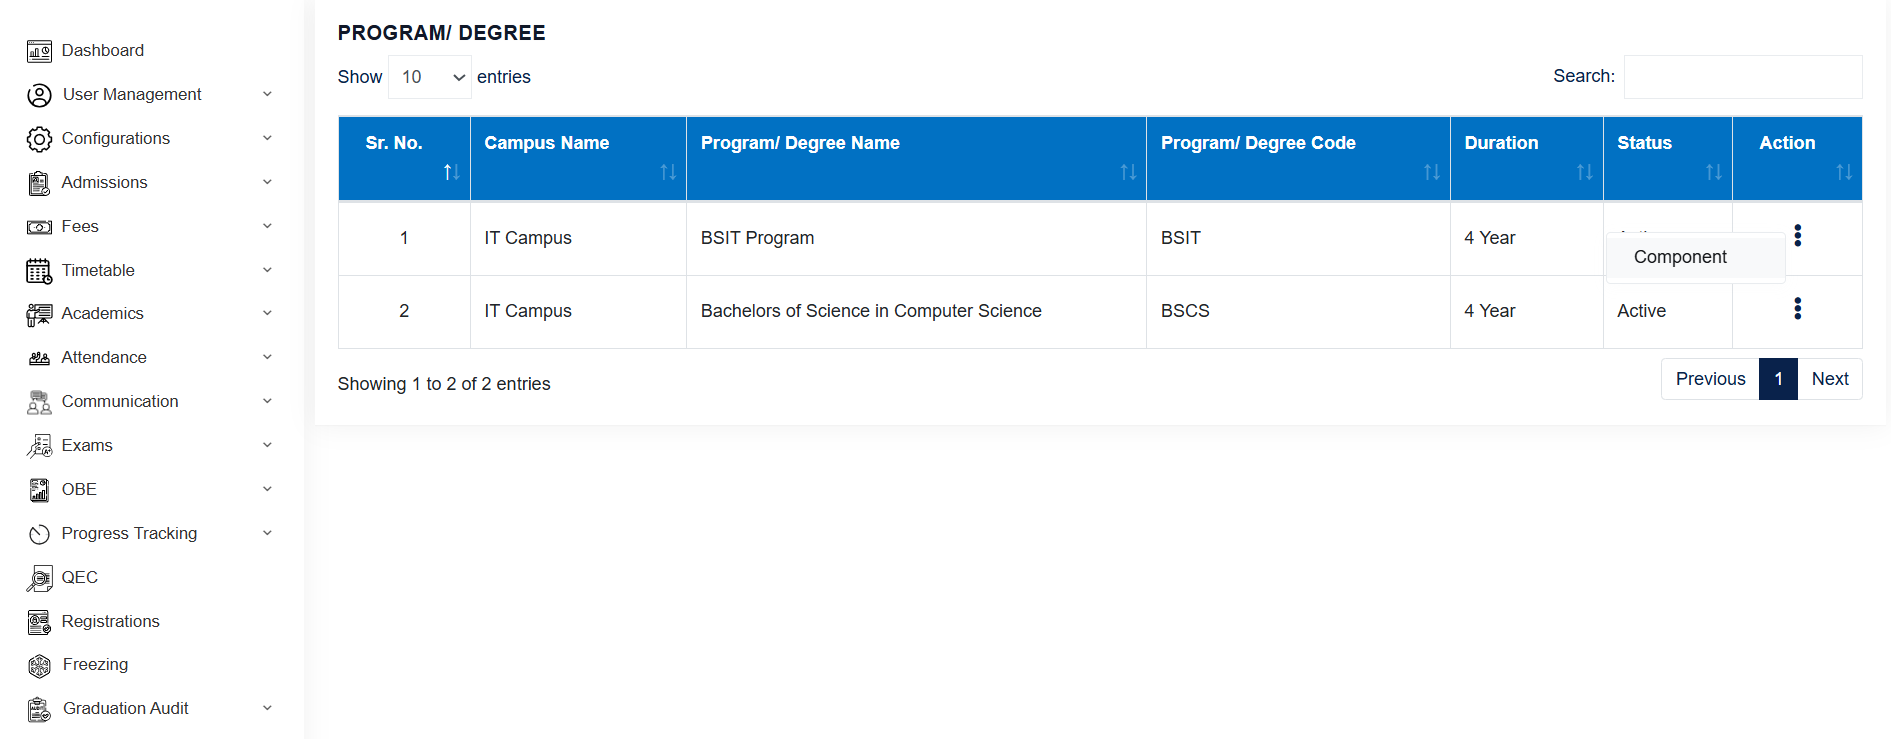
Program/Degree Name: The name of the program (e.g., BSIT Program, Bachelors of Science in Computer Science).
Program/Degree Code: A unique code for the program (e.g., BSIT, BSCS).
Duration: The duration of the program (e.g., 4 Year).
Status: Shows whether the program is Active or Inactive.
Action: This column contains buttons to manage each program.
5. Managing a Program (The “Action” Column)
To manage a program, look at the “Action” column and click the appropriate option:
View
What it does: Allows you to see all details of a program without making any changes.
Action: Click the “View” button/link.
What happens next: A new screen will open showing complete program information.
Update
What it does: Allows you to edit the program information.
Action: Click the “Update” button/link.
What happens next: You will be taken to an edit form where you can make changes. Click “Save” to confirm.
Student List
What it does: Shows all students enrolled in this program.
Action: Click the “Student List” button/link.
What happens next: The Student List screen will open showing all students in this program.
POs (Program Objectives)
What it does: Allows you to manage Program Objectives (POs) for this program.
Action: Click the “POs” button/link.
What happens next: The Program Objectives screen will open where you can add, update, or delete POs.
Tentative Study Plan
What it does: Allows you to view and manage the tentative study plan for this program.
Action: Click the “Tentative Study Plan” button/link.
What happens next: The Tentative Study Plan screen will open showing semester-wise course distribution.
Soft Delete
What it does: This hides the program from the main list. The program is not permanently removed.
Action: Click the “Soft Delete” button/link.
What happens next: A confirmation message will pop up. Click “Yes” to confirm.
Hard Delete
What it does: This permanently removes the program from the system. Warning: This action cannot be undone.
Action: Click the “Hard Delete” button/link.
What happens next: A confirmation message will pop up warning you that this is permanent. Click “Yes” only if you are absolutely sure.
6. Adding a New Program/Degree
Step 1: Click Add Program/Degree
Look for the “Add Program/Degree” button at the top of the page.
Action: Click the “Add Program/Degree” button.
Step 2: Select Faculty
In the form, look for the “Faculty *” dropdown.
Action: Select the faculty to which this program belongs.
Prog / Deg. Name *: Enter the full name of the program (e.g., “Bachelors of Science in Computer Science”).
Prog / Deg. Code *: Enter a unique code for the program (e.g., “BSCS”).
Prog / Deg. Model *: Select the program model.
Semester Type *: Select the semester type (e.g., Semester System, Annual System).
Step 4: Set Duration and Credit Hours
Min. Duration *: Select the minimum duration of the program.
Max. Duration *: Select the maximum duration of the program.
Min. Credit Hours *: Enter the minimum credit hours required.
Min. Passing Criteria *: Set the minimum passing criteria.
Step 5: Select Additional Settings
Status *: Select Active or Inactive.
Year *: Select the academic year.
Batch *: Select the batch.
Scholarship *: Select if scholarships are applicable.
Probation Limit *: Set the probation limit.
Taxonomy *: Select the taxonomy (or select “Not Applicable”).
Step 6: Enter Vision and Mission
Vision *: Enter the program’s vision statement.
Mission *: Enter the program’s mission statement.
Step 7: Enrollment Criteria
Area/Specialization: Enter any specialization details.
Enrollment Criteria: Define the enrollment criteria.
Step 8: Save the Program
Action: After filling in all details, click the “Continue” or “Add” button.
What happens next: The new program will be saved and will appear in the program list.
7. Tentative Study Plan
Purpose
This screen shows the semester-wise course distribution for a program. It displays which courses students will take in each semester.
Step-by-Step Guide
Step 1: View Study Plan
The table shows courses grouped by semester:
Semester 1: Courses for the first semester.
Sr. No: Serial number of the course.
Course Code: The unique code of the course (e.g., DB123, ENG951).
Course Name: The full name of the course (e.g., Database, English).
Crdt Hrs.: The credit hours for the course.
Step 2: Navigate Through Semesters
Scroll down or use the navigation to view courses for all semesters (Semester 1, Semester 2, etc.).
8. Program Objectives (POs)
Purpose
This screen allows you to manage Program Objectives (POs) for a specific program. POs are the learning outcomes that students are expected to achieve after completing the program.
Step-by-Step Guide
Step 1: View Program Objectives
The table shows all POs with the following columns:
Sr. No.: The serial number of the PO.
Objectives: The description of the program objective (e.g., PO1, PO2, PO3).
Action: Contains buttons to manage each PO.
Step 2: Add a Program Objective
Action: Click the “Add PO” button.
What happens next: A form will open where you can enter the objective description.
Step 3: Manage POs
PLOs: Click to map Program Learning Outcomes.
Soft Delete: Deactivate a PO.
Hard Delete: Permanently delete a PO.
9. Student List
Purpose
This screen shows all students enrolled in a specific program.
Step-by-Step Guide
Step 1: View Student List
The table shows all students with the following columns:
Student Name: The complete name of the student.
Roll Number: The student’s unique roll number.
Status: The student’s enrollment status (e.g., Section Allocated).
Step 2: Change Student Status
At the bottom of the screen, you will see a section labeled “Change Status”.
Action: Select the student(s) you want to update.
Action: Select the new status from the “Status *” dropdown.
Action: Click the “Change Status” button to apply the changes.
10. Exporting Program Data
Click the “Export to Excel” button at the bottom of the program list.
What happens next: A spreadsheet file will be downloaded containing all program data.
11. What to do next?
If you added a new program: The program will appear in the list. You can now add courses, assign students, and set up the study plan.
If you updated a program: The changes will be reflected immediately.
If you managed POs: The program objectives will be used for OBE mapping and accreditation purposes.
If you viewed the student list: You can manage student statuses and enrollment.
If you want to manage other configurations: Use the sidebar to navigate to other configuration options like Courses, Sections, Semester, etc.
Tips:
1. Program Objectives (POs) are essential for OBE (Outcome-Based Education). Define them clearly as they are used for accreditation and program evaluation.
2. The Tentative Study Plan helps students plan their academic journey. Make sure courses are distributed correctly across semesters.
3. Use the “Student List” to quickly see which students are enrolled in a program and manage their status.
4. Before deleting a program, make sure no students are currently enrolled. Use “Soft Delete” first to be safe.
User Guide: Semester Management
1. Purpose of this Screen
This screen allows you to manage all semesters for academic programs in the evERP system. Semesters are academic periods within a program (e.g., Semester 1, Semester 2). From here, you can create new semesters, assign them to specific programs, set start and end dates, configure add/drop periods, and manage existing semesters.
2. Semester Main Screen – How to Use
Step 1: Filter by Faculty and Program
At the top of the page, you will see filter options:
Select Faculty: Choose a faculty from the dropdown to view semesters only for that faculty.
Select Program: Choose a specific program from the dropdown to view semesters only for that program.
Action: Click the “Get Data” or “Refresh” button to update the semester list after selecting filters.
Step 2: Change How Many Semesters You See
Next to the Search box, you will see a dropdown that says “Show Entries: 10”.
Action: Click this dropdown and select a number (e.g., 25, 50, or 100). This controls how many semesters are displayed on one page.
Step 3: View the Semester List
The main table shows you all semesters with the following columns:
Sr. No.: The serial number of the semester.
Campus: The campus where the semester is offered.
Faculty: The faculty offering the semester.
Program/Degree: The program to which the semester belongs.
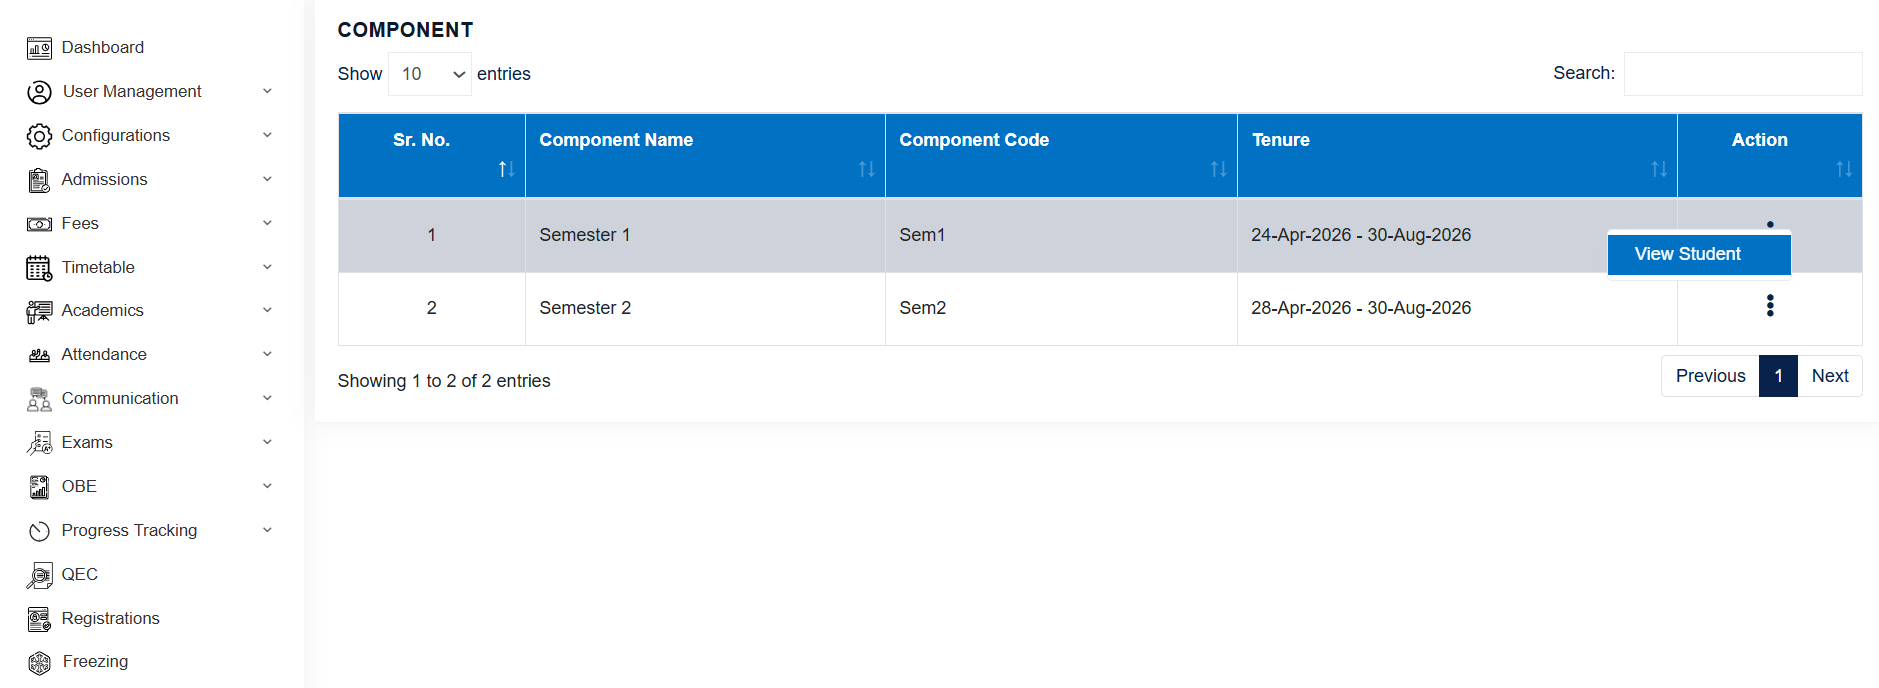
Semester Name: The name of the semester (e.g., Semester 1, Semester 2).
Semester Code: A unique code for the semester (e.g., Sem1, Sem2).
Tenure: The start and end dates of the semester.
Action: This column contains buttons to manage each semester.
4. Managing a Semester (The “Action” Column)
To manage a semester, look at the “Action” column and click the appropriate option:
Update
What it does: Allows you to edit the semester information (e.g., change dates, modify semester name).
Action: Click the “Update” button/link.
What happens next: You will be taken to an edit form where you can make changes. Click “Save” to confirm.
Soft Delete
What it does: This hides the semester from the main list. The semester is not permanently removed.
Action: Click the “Soft Delete” button/link.
What happens next: A confirmation message will pop up. Click “Yes” to confirm.
Hard Delete
What it does: This permanently removes the semester from the system. Warning: This action cannot be undone.
Action: Click the “Hard Delete” button/link.
What happens next: A confirmation message will pop up warning you that this is permanent. Click “Yes” only if you are absolutely sure.
5. Adding a New Semester
Step 1: Access Add Semester Form
Look for the “Add Semester” button at the top of the page.
Action: Click the “Add Semester” button.
Step 2: Select Faculty and Program
Faculty *: Select the faculty to which this semester belongs.
Program/Degree *: Select the program to which this semester belongs.
Step 3: Enter Semester Details
Fill in the following required fields:
Semester Name *: Enter the name of the semester (e.g., “Semester 1”, “Fall Semester”).
Semester Code *: Enter a unique code for the semester (e.g., “Sem1”, “FALL2024”).
Semester Number *: Enter the semester number (e.g., 1, 2, 3).
Step 4: Set Semester Dates
Semester Start Date *: Select the start date of the semester using the date picker.
Semester End Date *: Select the end date of the semester using the date picker.
Step 5: Configure Add/Drop Period
Add/Drop Limit (Start) *: Select the date when the add/drop period starts.
Add/Drop Limit (End) *: Select the date when the add/drop period ends.
Step 6: Select Semester Offering
Semester Offering *: Select when the semester is offered (e.g., Fall, Spring, Summer).
Step 7: Save the Semester
Action: After filling in all details, click the “Add Semester” button.
What happens next: The new semester will be saved and will appear in the semester list.
6. Exporting Semester Data
Click the “Export to Excel” button at the bottom of the semester list.
What happens next: A spreadsheet file will be downloaded containing all semester data.
7. What to do next?
If you added a new semester: The semester will appear in the list. You can now create sections, assign courses, and manage student enrollments for this semester.
If you updated a semester: The changes will be reflected immediately in all reports and schedules.
If you want to manage other configurations: Use the sidebar to navigate to other configuration options like Courses, Sections, etc.
Tips:
1. Ensure semester dates do not overlap with other semesters for the same program.
2. Set the Add/Drop period dates carefully. This is the window during which students can enroll in or withdraw from courses.
3. Use consistent naming conventions for semester codes (e.g., “Sem1”, “Sem2”) to make it easy to identify.
4. Before deleting a semester, make sure no courses, sections, or student enrollments are associated with it. Use “Soft Delete” first to be safe.
User Guide: Courses Management
1. Purpose of this Screen
This screen allows you to manage all courses offered in the evERP system. Courses are the individual subjects taught within programs (e.g., Database, English, Applied Physics). From here, you can create new courses, view course details, configure CLOs (Course Learning Outcomes), add rubrics, manage topics and resources, and perform various other course-related actions.
2. Courses Main Screen – How to Use
Step 1: Filter Courses by Faculty, Program, and Semester
At the top of the page, you will see filter options:
Select Faculty: Choose a faculty from the dropdown to view courses only for that faculty.
Select Program: Choose a specific program from the dropdown to view courses only for that program.
Select Semester: Choose a semester from the dropdown to view courses only for that semester.
Action: Click the “Get Data” or “Refresh” button to update the course list after selecting filters.
Step 2: Change How Many Courses You See
Next to the Search box, you will see a dropdown that says “Show Entries: 10”.
Action: Click this dropdown and select a number (e.g., 25, 50, or 100). This controls how many courses are displayed on one page.
Step 3: View the Course List
The main table shows you all courses with the following columns:
Sr. No.: The serial number of the course.
Program/Degree Name: The program to which the course belongs.
Semester Name: The semester in which the course is offered.
Course Name: The name of the course (e.g., Database, English).
Course Code: A unique code for the course (e.g., DB123, ENG).
Action: This column contains a dropdown with multiple options to manage each course.
4. Course Action Dropdown (The “Action” Column)
To manage a course, look at the “Action” column and click the dropdown to select the appropriate option:
View Course
What it does: Allows you to see all details of a course without making any changes.
Action: Click the “View Course” option from the dropdown.
What happens next: The Course Details screen will open showing complete course information.
Open Course Warehouse (OCW)
What it does: Opens the course in the Open Course Warehouse for content management. The Open Course Warehouse (OCW) is a repository where course materials, topics, and resources are stored and can be shared across courses.
Action: Click the “OCW” option from the dropdown.
What happens next: The Open Course Warehouse screen will open showing all course content and resources.
Configure CLOs
What it does: Allows you to configure Course Learning Outcomes (CLOs) for this course.
Action: Click the “Configure CLOs” option from the dropdown.
What happens next: The CLOs screen will open where you can create and manage CLOs.
Add Rubrics
What it does: Allows you to add and manage rubrics for assessments in this course.
Action: Click the “Add Rubrics” option from the dropdown.
What happens next: The Rubrics screen will open where you can create rubrics.
View Scorms
What it does: Allows you to view SCORM-compliant learning content for this course.
Action: Click the “View Scorms” option from the dropdown.
What happens next: The SCORM content viewer will open.
Update Course
What it does: Allows you to edit the course information.
Action: Click the “Update Course” option from the dropdown.
What happens next: You will be taken to an edit form where you can make changes.
Soft Delete
What it does: This hides the course from the main list. The course is not permanently removed.
Action: Click the “Soft Delete” option from the dropdown.
What happens next: A confirmation message will pop up. Click “Yes” to confirm.
Hard Delete
What it does: This permanently removes the course from the system. Warning: This action cannot be undone.
Action: Click the “Hard Delete” option from the dropdown.
What happens next: A confirmation message will pop up warning you that this is permanent. Click “Yes” only if you are absolutely sure.
5. Adding a New Course
Step 1: Click Add Course
Look for the “Add Course” button at the top of the page.
Action: Click the “Add Course” button.
Step 2: Course Details Tab
Fill in the following required fields:
Faculty *: Select the faculty offering this course.
Program/Deg. Name *: Select the program to which this course belongs.
Semester Name *: Select the semester in which this course is offered.
Course Initials *: Enter the course initials (e.g., “DB” for Database).
Course Name *: Enter the full name of the course (e.g., “Database”).
Description *: Enter a description of the course.
Course Code *: Enter a unique code for the course (e.g., “DB123”).
Course Category: Select the course category (e.g., Elective, Mandatory).
Credit Hours (Theory) *: Enter the theory credit hours.
Credit Hours (Lab) *: Enter the lab credit hours.
Contact Hours *: Enter the total contact hours.
Offering Type *: Select the offering type (e.g., Normal).
Live Classes in Course *: Enter the number of live classes.
Course Outline: Click “Choose File” to upload the course outline.
Lab Course Outline: Click “Choose File” to upload the lab course outline.
Course Image: Upload a course image (optional).
Step 3: Pre Reqs. Tab
Select Faculty: Select the faculty for prerequisites (if any).
Select Scheme: Select the scheme for mapping POs and PLOs.
Step 5: Save the Course
Action: After filling in all details, click the “Save” or “Add Course” button.
What happens next: The new course will be saved and will appear in the course list.
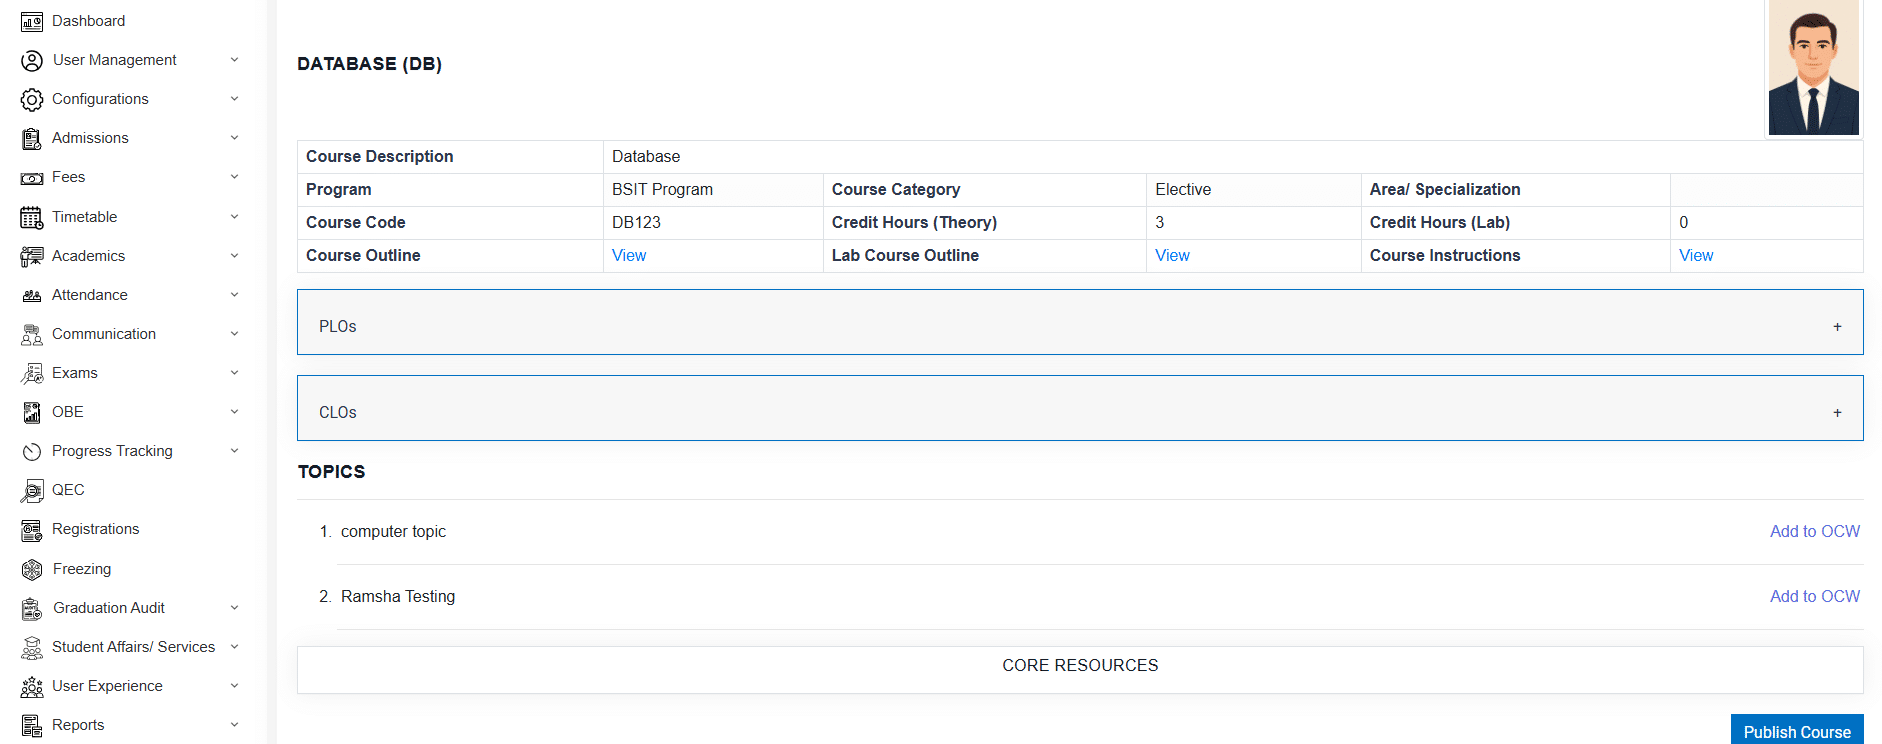
6. Course Details Screen
Purpose
This screen displays complete course information in a detailed view. You can access this by clicking “View Course” from the action dropdown.
Information Displayed
The screen shows the following sections:
Course Details: Program, Semester, Course Initials, Course Name, Description, Category, Code, Credit Hours, Offering Type, Live Classes, Dates, etc.
Course Outline: Click “View” to see the course outline.
Lab Course Outline: Click “View” to see the lab outline.
Course Instructions: Click “View” to see instructions.
Available Tabs
Course Details: (Default view) Shows all course information.
Pre Reqs.: Shows prerequisite courses.
PLOs & CLOs: Shows mapping between Program Learning Outcomes and Course Learning Outcomes.
Topics Section
Displays a list of topics covered in the course.
Action: Click “Add to OCW” to add a topic to the Open Course Warehouse (OCW). This makes the topic available for reuse in other courses.
Core Resources
Displays core learning resources for the course.
Publish Course
Action: Click the “Publish Course” button to make the course available to students.
What happens next: The course will become visible and accessible to enrolled students.
7. Configure CLOs Screen
Purpose
This screen allows you to create and manage Course Learning Outcomes (CLOs) for a specific course.
Step-by-Step Guide
Step 1: View Existing CLOs
The table shows all existing CLOs with the following columns:
CLO: The CLO code (e.g., CLO1, CLO2, CLO3).
Delete: Click to delete a CLO.
Step 2: Create a New CLO
Action: Click the “Create CLO” button.
What happens next: A new CLO will be added with an auto-incremented number.
Step 3: PLO-CLO Tagging
PLO: Select a Program Learning Outcome from the dropdown.
CLO: Select a Course Learning Outcome from the dropdown.
Domain: Select the domain (e.g., Cognitive, Psychomotor).
Level: Select the taxonomy level (e.g., Remember, Understand, Apply).
Action: Click “Add” to map the PLO with the CLO.
8. Rubrics Screen
Purpose
This screen allows you to create and manage rubrics for assessments in a course. Rubrics help evaluate student performance based on specific criteria.
Step-by-Step Guide
Step 1: Create a Rubric
Enter Rubric Name: Type a name for the rubric.
Select Type: Choose the rubric type from the dropdown.
Action: Click the “Create” button.
Step 2: View Existing Rubrics
The table shows all existing rubrics with the following columns:
Sr. No: Serial number.
Assessment Type: The type of assessment.
Action: Click to edit or delete the rubric.
9. Exporting Course Data
Click the “Export to Excel” button at the bottom of the course list.
What happens next: A spreadsheet file will be downloaded containing all course data.
10. What to do next?
If you added a new course: The course will appear in the list. You can now configure CLOs, add rubrics, and publish the course.
If you configured CLOs: The CLOs will be used for student assessment and OBE mapping.
If you added rubrics: The rubrics will be available for grading student assessments.
If you added topics to OCW: The topics will be available in the Open Course Warehouse for reuse across other courses.
If you published a course: The course will become available to enrolled students.
Tips:
1. Always configure CLOs for each course. CLOs are essential for OBE and student assessment.
2. Use rubrics to ensure consistent and fair grading across all assessments.
3. The “Publish Course” button makes the course visible to students. Only publish when the course content is complete.
4. Use the “Add to OCW” (Open Course Warehouse) feature to share topics and resources across multiple courses. This saves time and ensures consistency.
5. The Open Course Warehouse (OCW) is a central repository for all course materials. Organize topics and resources properly for easy reuse.
User Guide: Sections Management
1. Purpose of this Screen
This screen allows you to manage all sections for courses offered in the evERP system. Sections are specific class groups within a course (e.g., Section A, Section B). From here, you can create new sections, assign teachers and teacher assistants, view student lists, and manage existing sections.
2. Sections Main Screen – How to Use
Step 1: Filter Sections by Faculty
At the top of the page, you will see a “Select Faculty” dropdown.
Action: Choose a faculty from the dropdown to view sections only for that faculty.
Action: Click the “Refresh Filter” button to update the section list after selecting a faculty.
Step 2: Find a Specific Section (Search)
At the top right of the table, you will see a “Search” box.
Action: Type any keyword (like course name, section name, or teacher name) into this box and press Enter. The table will automatically filter to show only matching sections.
Step 3: Change How Many Sections You See
Next to the Search box, you will see a dropdown that says “Show Entries: 10”.
Action: Click this dropdown and select a number (e.g., 25, 50, or 100). This controls how many sections are displayed on one page.
Step 4: View the Section List
The main table shows you all sections with the following columns:
Sr. No.: The serial number of the section.
Program/Degree Name: The program to which the course belongs.
Semester Name: The semester in which the course is offered.
Course: The name of the course (e.g., Database, English).
Section: The section name (e.g., Section1, Eng Section A, BSCS ICT Sec A).
Teacher’s Name: The teacher assigned to this section.
Action: This column contains a dropdown with multiple options to manage each section.
5. Section Action Dropdown (The “Action” Column)
To manage a section, look at the “Action” column and click the dropdown to select the appropriate option:
View Section
What it does: Allows you to see all details of a section without making any changes.
Action: Click the “View Section” option from the dropdown.
What happens next: The Section Details screen will open showing complete section information.
Students List
What it does: Shows all students enrolled in this section.
Action: Click the “Students List” option from the dropdown.
What happens next: The Students List screen will open showing all students in this section.
Update Section
What it does: Allows you to edit the section information (e.g., change teacher, add assistants).
Action: Click the “Update Section” option from the dropdown.
What happens next: You will be taken to an edit form where you can make changes.
Soft Delete
What it does: This hides the section from the main list. The section is not permanently removed.
Action: Click the “Soft Delete” option from the dropdown.
What happens next: A confirmation message will pop up. Click “Yes” to confirm.
Hard Delete
What it does: This permanently removes the section from the system. Warning: This action cannot be undone.
Action: Click the “Hard Delete” option from the dropdown.
What happens next: A confirmation message will pop up warning you that this is permanent. Click “Yes” only if you are absolutely sure.
6. Adding a New Section
Step 1: Click Add Section
Look for the “Add Section” button at the top of the page.
Action: Click the “Add Section” button.
Step 2: Select Faculty and Course
Fill in the following required fields:
Faculty *: Select the faculty offering this course.
Course Name *: Select the course for which you are creating a section.
Step 3: Enter Section Details
Faculty Name *: The faculty name will auto-populate based on your selection.
Section Name *: Enter the name for this section (e.g., “Section A”, “Morning Section”).
Step 4: Assign Teacher and Assistants
Teacher’s Name *: Select the teacher from the dropdown.
Teacher Assistant 01: Select the first teacher assistant from the dropdown (optional).
Teacher Assistant 02: Select the second teacher assistant from the dropdown (optional).
Step 5: Upload Documents
Project/Presentation: Click “Choose File” to upload project or presentation guidelines.
Instructions Document: Click “Choose File” to upload instructions for students.
Video URL: Enter a URL for any introductory or course-related video.
Teacher’s Profile (URL): Enter the URL for the teacher’s profile page.
Step 6: Save the Section
Action: After filling in all details, click the “Add Section” button.
What happens next: The new section will be saved and will appear in the section list.
7. Students List Screen
Purpose
This screen shows all students enrolled in a specific section. You can access this by clicking “Students List” from the action dropdown.
Step-by-Step Guide
Step 1: View the Student List
The table shows all students with the following columns:
Action: Contains buttons to manage each student in the section.
Step 2: Save Student Information
To update a student’s information, look at the “Action” column.
Action: Click the “Save” button to save any changes made to the student’s category or information.
Step 3: Change Section for a Student
To move a student to a different section, look at the “Action” column.
Action: Click the “Change Section” button.
What happens next: A form will open allowing you to select a new section for the student.
8. Exporting Section Data
Click the “Export to Excel” button at the bottom of the section list.
What happens next: A spreadsheet file will be downloaded containing all section data.
9. What to do next?
If you added a new section: The section will appear in the list. You can now enroll students in this section.
If you updated a section: The changes will be reflected immediately in all schedules and reports.
If you viewed the students list: You can manage student categories and move students between sections as needed.
Tips:
1. When creating sections, use clear naming conventions (e.g., “Section A”, “Section B”, “Morning Section”) to make it easy to identify.
2. Assign teacher assistants to help manage larger sections. This helps distribute the workload.
3. Use the “Students List” option to quickly see who is enrolled in each section and manage student categories.
4. The “Change Section” feature is useful when you need to move students between sections due to capacity or scheduling issues.
5. Before deleting a section, make sure no students are enrolled in it. Use “Soft Delete” first to be safe.
User Guide: Promotion by Management
1. Purpose of this Screen
This screen allows you to manage student promotions from one semester to the next in the evERP system. Promotion by Management is used to promote students to the next semester or academic year based on their performance and eligibility. This is a critical function for academic progression and student lifecycle management.
2. Step 1: Select Program/Degree
Purpose
The first screen shows a list of all programs and degrees available in the system. You need to select a program to proceed with promotion.
Step-by-Step Guide
Step 1: View the Program List
The table shows you all programs with the following columns:
Sr. No.: The serial number of the program.
Campus Name: The campus where the program is offered.
Program/Degree Name: The name of the program (e.g., BSIT Program, Bachelors of Science in Computer Science).
Program/Degree Code: A unique code for the program (e.g., BSIT, BSCS).
Duration: The duration of the program (e.g., 4 Year).
Status: Shows whether the program is Active or Inactive.
Action: Click to select the program and proceed to the next step.
Step 2: Select the Program
Action: Click on the program name or the action button for the program you want to promote students for.
What happens next: You will be taken to the Component (Semester) screen where you can select the semester.
3. Step 2: Select Component (Semester)
Purpose
The second screen shows a list of all components or semesters for the selected program. You need to select the semester from which students will be promoted.
Step-by-Step Guide
Step 1: View the Component List
The table shows you all semesters with the following columns:
Sr. No.: The serial number of the semester.
Component Name: The name of the semester (e.g., Semester 1, Semester 2).
Component Code: A unique code for the semester (e.g., Sem1, Sem2).
Tenure: The start and end dates of the semester.
Action: Click to select the semester and proceed to the next step.
Step 2: Search for a Specific Semester
At the top right, you will see a “Search” box.
Action: Type any keyword (like semester name or code) into this box and press Enter. The table will automatically filter to show only matching semesters.
Step 3: Select the Semester
Action: Click on the semester name or the action button for the semester from which you want to promote students.
What happens next: You will be taken to the All Students screen where you can see the list of students eligible for promotion.
4. Step 3: Manage Student Promotion
Purpose
The third screen shows all students enrolled in the selected program and semester. From here, you can promote students to the next semester or academic year. You can also manage fees and other charges associated with promotion.
Step-by-Step Guide
Step 1: View the Student List
The table shows you all students with the following columns:
Sr. No.: The serial number of the student.
Full Name: The complete name of the student.
Father’s Name: The student’s father’s name.
Roll No: The student’s unique roll number.
Fee/Other: Fee-related information including:
Tuition Fee: Checkbox to select for tuition fee collection.
Enter Tuition Fee: Field to enter the tuition fee amount.
Other Fee: Checkbox to select for other fee collection.
Enter Other Fee: Field to enter other fee amounts.
Subject: Additional subject-related information (if applicable).
Step 2: Enter Fee Information
For each student, you can enter the following fee details:
Tuition Fee: Check the box and enter the tuition fee amount in the field.
Other Fee: Check the box and enter any other fee amount (e.g., exam fee, lab fee, library fee).
Step 3: Promote Students
After entering fee information for all students, look for the promotion action button.
Action: Click the “Promote” or “Submit” button to promote selected students to the next semester.
What happens next: The system will:
Promote students to the next semester.
Generate fee challans for the entered amounts.
Update student records with the new semester information.
Show a success message confirming the promotion.
Step 4: Search for a Specific Student
At the top right, you will see a “Search” box.
Action: Type any keyword (like student name or roll number) into this box and press Enter. The table will automatically filter to show only matching students.
Step 5: Export Student Data
Click the “Export to Excel” button at the bottom of the student list.
What happens next: A spreadsheet file will be downloaded containing all student data for the selected semester.
5. What to do next?
If you promoted students: The students will be moved to the next semester. They will receive notifications about their promotion and any applicable fees.
If you need to re-enter fees: You can go back and update the fee information for any student before promoting.
If you want to view promoted students: Navigate to the new semester’s student list to verify the promotion.
Tips:
1. Before promoting students, ensure that all grades and assessments for the current semester have been finalized.
2. Double-check fee entries for each student. Incorrect fee amounts can cause issues with student accounts.
3. Use the “Search” feature to quickly find specific students, especially when dealing with large batches.
4. Promotion by Management is typically done at the end of each semester. Plan ahead and complete all academic and financial requirements before initiating promotion.
5. If a student is not eligible for promotion (e.g., failed courses), make sure to exclude them from the promotion list or mark them as “Hold” before promoting others.
User Guide: Roll No. Configuration
1. Purpose of this Screen
This screen allows you to configure and generate roll numbers for students in the evERP system. Roll numbers are unique identifiers assigned to each student, typically based on their program, campus, year, and semester. This configuration screen lets you define the criteria for generating roll numbers automatically.
2. Step-by-Step Guide (How to Configure Roll Numbers)
Step 1: Select Institute
Look for the “Institute” dropdown field.
Action: Select the institute from the dropdown (if multiple institutes exist in the system).
Step 2: Select Campus
Look for the “Campus” dropdown field.
Action: Select the campus for which you want to generate roll numbers.
Why this matters: Roll numbers often include campus codes to identify where the student is enrolled.
Step 3: Select Faculty
Look for the “Faculty” dropdown field.
Action: Select the faculty to which the students belong.
Step 4: Select Program/Degree
Look for the “Program/Degree” dropdown field.
Action: Select the program or degree for which you want to generate roll numbers.
Why this matters: Roll numbers typically include program codes (e.g., BSCS, BSIT).
Step 5: Select Year
Look for the “Year” dropdown field.
Action: Select the academic year for the students.
Why this matters: Roll numbers often include the year of admission or current academic year.
Step 6: Select Semester
Look for the “Semester” dropdown field.
Action: Select the semester for which you want to generate roll numbers.
Why this matters: Roll numbers may include semester information to track student progression.
Step 7: Generate Roll Numbers
After selecting all the required fields, look for the “Save” button.
Action: Click the “Save” button.
What happens next: The system will automatically generate roll numbers for all students matching the selected criteria. The roll numbers will be assigned to each student’s record.
3. Understanding Roll Number Structure
Roll numbers in evERP are typically generated using a combination of the following elements:
Element
Description
Example
Campus Code
Unique code for the campus
IC (Islamabad Campus)
Program Code
Unique code for the program
BSCS, BSIT
Year
Academic year of admission
2024
Semester
Current semester
1, 2, 3
Sequence Number
Auto-generated unique number
001, 002, 003
Example Roll Number: IC-BSCS-2024-1-001
This represents: Islamabad Campus – BSCS Program – 2024 Admission – Semester 1 – Student #001
4. What to do next?
If you generated roll numbers: The roll numbers will be assigned to all students matching the selected criteria. You can view them in the “All Students” or “Students” list.
If you need to regenerate roll numbers: You can update the selections and click “Save” again. The system will overwrite existing roll numbers with new ones.
If you want to manage other configurations: Use the sidebar to navigate to other configuration options like Grade, Assessments, etc.
Tips:
1. Roll numbers should be unique for each student. The system automatically ensures uniqueness by combining multiple criteria.
2. Configure roll numbers at the beginning of each academic year or semester before students are enrolled.
3. Make sure all selections (Campus, Faculty, Program, Year, Semester) are correct before clicking “Save” to avoid generating incorrect roll numbers.
4. Roll numbers are used across the system for student identification, so ensure they follow a consistent format.
5. If you have multiple campuses, make sure the campus code is clearly identifiable in the roll number structure.
User Guide: Grade Book Management
1. Purpose of this Screen
This screen allows you to manage grade books in the evERP system. Grade books define the grading criteria used to evaluate student performance. You can create different grading periods (e.g., Semester, Annual), define grade types (Absolute or Progressive), and set grade labels with their corresponding grade points and percentage ranges.
2. Grade Book Main Screen – How to Use
Step 1: Find a Specific Grade Book (Search)
At the top right of the table, you will see a “Search” box.
Action: Type any keyword (like grading period or grade type) into this box and press Enter. The table will automatically filter to show only matching grade books.
Step 2: Change How Many Grade Books You See
Next to the Search box, you will see a dropdown that says “Show Entries: 10”.
Action: Click this dropdown and select a number (e.g., 25, 50, or 100). This controls how many grade books are displayed on one page.
Step 3: View the Grade Book List
The main table shows you all grade books with the following columns:
Sr. No.: The serial number of the grade book.
Grading Period: The period for which the grade book applies (e.g., Semester, Annual).
Grade Type: The type of grading used. Options include:
Absolute: Grades are assigned based on fixed percentage thresholds (e.g., 85-100% = A).
Progressive: Grades are assigned based on cumulative improvement or progressive criteria.
Action: This column contains buttons to manage each grade book.
4. Managing a Grade Book (The “Action” Column)
To manage a grade book, look at the “Action” column and click the appropriate option:
View
What it does: Allows you to see all details of a grade book, including all grade labels, grade points, and percentage ranges.
Action: Click the “View” button/link.
What happens next: The View Grade Book screen will open showing complete grade details.
Soft Delete
What it does: This hides the grade book from the main list. The grade book is not permanently removed.
Action: Click the “Soft Delete” button/link.
What happens next: A confirmation message will pop up. Click “Yes” to confirm.
Hard Delete
What it does: This permanently removes the grade book from the system. Warning: This action cannot be undone.
Action: Click the “Hard Delete” button/link.
What happens next: A confirmation message will pop up warning you that this is permanent. Click “Yes” only if you are absolutely sure.
5. Adding a New Grade Book
Step 1: Click Add Grade Book
Look for the “Add Grade Book” button at the top of the page.
Action: Click the “Add Grade Book” button.
Step 2: Select Grading Period
Look for the “Grading Period” dropdown field.
Action: Select the grading period (e.g., Semester, Annual, Mid-Term).
Step 3: Select Grading Type
Look for the “Grade Type” or “Grading Type” dropdown field.
Action: Select the grading type from the following options:
Absolute: Use fixed percentage thresholds to assign grades (e.g., 85-100% = A, 80-84% = A-). This is the most common grading system.
Progressive: Use progressive criteria where grades are assigned based on cumulative performance or improvement over time. This may be used for projects, research work, or skill-based assessments.
Step 4: Add Grade Points
For each grade you want to add, fill in the following:
Grade Point: Enter the grade label (e.g., A, A-, B+, B).
Min Percentage: Enter the minimum percentage for this grade.
Max Percentage: Enter the maximum percentage for this grade.
Action: Click the “Add” button to add the grade to the grade book.
Step 5: Save the Grade Book
After adding all grades, look for the “Save” or “Add Grade Book” button.
Action: Click the button to save the grade book.
What happens next: The new grade book will be saved and will appear in the grade book list.
6. Understanding Grading Types
Absolute Grading
What it is: Grades are assigned based on fixed percentage ranges that do not change.
When to use: Most common for semester and annual grading systems.
Example:
85-100% = A (4.00)
80-84% = A- (3.67)
75-79% = B+ (3.33)
71-74% = B (3.00)
68-70% = B- (2.67)
And so on…
Progressive Grading
What it is: Grades are assigned based on cumulative improvement or progressive achievement criteria.
When to use: Often used for:
Research projects
Skill-based assessments
Portfolio-based evaluations
Courses with multiple milestones
Example: Students may start with a baseline grade and improve based on completing progressive milestones throughout the course.
7. View Grade Book Screen
Purpose
This screen displays the complete grade structure for a specific grade book. You can access this by clicking “View” from the action column.
Information Displayed
The table shows all grades with the following columns:
Sr. No.: The serial number of the grade.
Grade Label: The letter grade (e.g., A, A-, B+, B).
Grade Point: The grade point value (e.g., 4.00, 3.67, 3.33).
Start %age: The minimum percentage for this grade.
End %age: The maximum percentage for this grade.
Example Absolute Grade Scale
Grade Label
Grade Point
Start %age
End %age
A
4.00
85
100
A-
3.67
80
84
B+
3.33
75
79
B
3.00
71
74
B-
2.67
68
70
C+
2.33
64
67
C
2.00
60
63
C-
1.67
57
59
D+
1.33
53
56
D
1.00
50
52
8. Exporting Grade Book Data
Click the “Export to Excel” button at the bottom of any grade book list.
What happens next: A spreadsheet file will be downloaded containing all grade book data.
9. What to do next?
If you added a new grade book: The grade book will appear in the list. You can now use it for grading student assessments.
If you viewed a grade book: You can see all grade details and verify that the percentage ranges are correct.
If you want to manage other configurations: Use the sidebar to navigate to other configuration options like Assessments, Promotions, etc.
Tips:
1. Ensure percentage ranges do not overlap. Each grade should have a unique range (e.g., A: 85-100, A-: 80-84).
2. Choose Absolute grading for standard semester/annual grading where fixed percentages determine grades.
3. Choose Progressive grading for courses that require cumulative assessment or improvement tracking.
4. Grade points are used to calculate GPA (Grade Point Average). Enter them carefully as they affect student transcripts.
5. Before deleting a grade book, make sure no assessments or student results are using it. Use “Soft Delete” first to be safe.
User Guide: Grade Criteria Management
1. Purpose of this Screen
This screen allows you to assign grading criteria to specific courses and sections in the evERP system. Grade criteria define how students in a particular course section will be graded. By linking a grade book to a course and section, you ensure consistent grading across all students in that section.
2. Grade Criteria Main Screen – How to Use
Step 1: Find Specific Grade Criteria (Search)
At the top right of the table, you will see a “Search” box.
Action: Type any keyword (like course name, section name, or criteria type) into this box and press Enter. The table will automatically filter to show only matching grade criteria.
Step 2: Change How Many Criteria You See
Next to the Search box, you will see a dropdown that says “Show Entries: 10”.
Action: Click this dropdown and select a number (e.g., 25, 50, or 100). This controls how many grade criteria are displayed on one page.
Step 3: View the Grade Criteria List
The main table shows you all grade criteria with the following columns:
Sr. No.: The serial number of the grade criteria.
Main Criteria Type: The main grading criteria type (e.g., Absolute-Semester).
Sub Criteria Type: The sub-grading criteria type (e.g., Absolute).
Course Name: The course to which this grading criteria applies.
Section Name: The section to which this grading criteria applies.
Action: This column contains buttons to manage each grade criteria.
4. Managing Grade Criteria (The “Action” Column)
To manage grade criteria, look at the “Action” column and click the appropriate option:
View Gradebook
What it does: Allows you to view the grade book assigned to this course section.
Action: Click the “View Gradebook” button/link.
What happens next: The View Grade Book screen will open showing all grade details.
Soft Delete
What it does: This hides the grade criteria from the main list. The criteria is not permanently removed.
Action: Click the “Soft Delete” button/link.
What happens next: A confirmation message will pop up. Click “Yes” to confirm.
Hard Delete
What it does: This permanently removes the grade criteria from the system. Warning: This action cannot be undone.
Action: Click the “Hard Delete” button/link.
What happens next: A confirmation message will pop up warning you that this is permanent. Click “Yes” only if you are absolutely sure.
5. Adding New Grade Criteria
Step 1: Click Add Grading Criteria
Look for the “Add Grading Criteria” or “Add Criteria” button at the top of the page.
Action: Click the “Add Criteria” button.
Step 2: Select Faculty
Look for the “Faculty” dropdown field.
Action: Select the faculty to which the course belongs.
Step 3: Select Program/Degree Name
Look for the “Prog./Deg. Name” dropdown field.
Action: Select the program or degree to which the course belongs.
Step 4: Select Semester Name
Look for the “Semester Name” dropdown field.
Action: Select the semester in which the course is offered.
Step 5: Select Course Name
Look for the “Course Name” dropdown field.
Action: Select the course for which you want to assign grading criteria.
Step 6: Select Section Name
Look for the “Section Name” dropdown field.
Action: Select the section to which you want to assign grading criteria.
Step 7: Select Grading Type
Look for the “Grading Type” dropdown field.
Action: Select the grading type from the options:
Absolute-Semester: Absolute grading based on semester performance.
Progressive-Semester: Progressive grading based on semester performance.
Step 8: Save the Grade Criteria
Action: After filling in all details, click the “Add Criteria” button.
What happens next: The grade criteria will be saved. The selected course and section will now use the specified grading type.
6. Understanding Grading Types in Grade Criteria
Absolute-Semester
What it is: Students are graded based on fixed percentage thresholds for the semester.
How it works: A student’s semester performance is evaluated against a fixed grading scale.
When to use: Most common for standard semester courses with exams and assignments.
Progressive-Semester
What it is: Students are graded based on cumulative improvement or progressive achievement.
How it works: Grades are assigned based on how students progress through milestones or show improvement over time.
When to use: Useful for project-based courses, research work, or skill-based assessments where growth matters.
7. Exporting Grade Criteria Data
Click the “Export to Excel” button at the bottom of the grade criteria list.
What happens next: A spreadsheet file will be downloaded containing all grade criteria data.
8. What to do next?
If you added grade criteria: The criteria will be applied to the selected course and section. Students in that section will be graded using the selected grading type.
If you viewed the gradebook: You can see all grade details and verify that the grading scale is correct.
If you want to assign grade criteria to other sections: Add more grade criteria for other course sections.
Tips:
1. Each course section must have grade criteria assigned before student assessments can be graded.
2. Make sure the grading type matches the grade book you created earlier (e.g., if you created an Absolute grade book, use Absolute-Semester here).
3. If a course has multiple sections, you can assign different grading criteria to each section if needed.
4. Before deleting grade criteria, ensure no students have been graded using it. Use “Soft Delete” first to be safe.
User Guide: Assessments Management
1. Purpose of this Screen
This screen allows you to configure and manage assessments for courses in the evERP system. Assessments define how students will be evaluated in a course, including the weightage for different assessment types like Attendance, Assignments, Quizzes, Mid-Term, Projects, and Final Exams. By configuring assessments, you set the grading structure for each course.
2. Assessments Main Screen – How to Use
Step 1: Find Specific Assessments (Search)
At the top right of the table, you will see a “Search” box.
Action: Type any keyword (like faculty name, course name, or program name) into this box and press Enter. The table will automatically filter to show only matching assessment configurations.
Step 2: Change How Many Assessments You See
Next to the Search box, you will see a dropdown that says “Show Entries: 10”.
Action: Click this dropdown and select a number (e.g., 25, 50, or 100). This controls how many assessment configurations are displayed on one page.
Step 3: View the Assessment List
The main table shows you all assessment configurations with the following columns:
Sr. No.: The serial number of the assessment configuration.
Faculties: The faculty offering the course.
Program/Degree Name: The program to which the course belongs.
Course Name: The name of the course.
Action: This column contains buttons to manage each assessment configuration.
4. Managing Assessments (The “Action” Column)
To manage an assessment configuration, look at the “Action” column and click the appropriate option:
Update Assessments Config.
What it does: Allows you to edit the assessment weightage for a course.
Action: Click the “Update Assessments Config.” button/link.
What happens next: The View Assessment Configurations screen will open where you can view and update weightage.
Soft Delete
What it does: This hides the assessment configuration from the main list. It is not permanently removed.
Action: Click the “Soft Delete” button/link.
What happens next: A confirmation message will pop up. Click “Yes” to confirm.
Hard Delete
What it does: This permanently removes the assessment configuration from the system. Warning: This action cannot be undone.
Action: Click the “Hard Delete” button/link.
What happens next: A confirmation message will pop up warning you that this is permanent. Click “Yes” only if you are absolutely sure.
5. Adding a New Assessment Configuration
Step 1: Click Add Assessment
Look for the “Add Assessment” button at the top of the page.
Action: Click the “Add Assessment” button.
Step 2: Select Filters
Select Faculty: Choose the faculty from the dropdown.
Select Program: Choose the program from the dropdown.
Select Semester: Choose the semester from the dropdown.
Select Course: Choose the course from the dropdown.
Step 3: Configure Assessment Weightage
Set the weightage (percentage) for each assessment type. The total weightage should equal 100%.
Assessment Component
Description
Typical Weightage
Attendance
Student attendance in classes
5-10%
No. of Assignments/Viva
Number of assignments or viva sessions
2
Assignments/Viva Weightage
Weightage for assignments or viva
10%
No. of Quizzes/PLS
Number of quizzes or PLS sessions
2
Quiz/PLS Weightage
Weightage for quizzes or PLS
10%
Project/Presentation
Weightage for projects or presentations
10-15%
Mid-Term/Report
Weightage for mid-term exams or reports
20%
Class Participation
Weightage for class participation
5%
Lab
Weightage for lab work
20%
Final
Weightage for final exam
30-40%
Step 4: Save the Assessment Configuration
Look for the “Add” button at the bottom of the page.
Action: Click the “Add” button to save the assessment configuration.
What happens next: The assessment configuration will be saved and appear in the list.
This screen displays the complete assessment weightage for a specific course. You can access this by clicking “Update Assessments Config.” from the action column. From here, you can both view and update the weightage values.
Course Information Displayed
The top of the screen shows the filters applied for this assessment configuration:
Faculty: The faculty offering the course.
Semester Name: The semester in which the course is offered.
Program/Degree Name: The program to which the course belongs.
Course Name: The name of the course.
Assessment Weightage Table
The table displays all assessment components with their weightage values. The screen is divided into three main sections:
Sessional Assessment: These are assessments conducted during the semester.
Assessment Type
Value
Assessment Type
Value
Attendance
10
Total No. of Classes
10
No. of Assignments/Viva
2
Assignments/Viva Weightage
10
No. of Quizzes/PLS
2
Quizzes/PLS Weightage
10
Project/Presentation
10
Mid-Term/Report
20
Lab Assessment: Assessments conducted in the lab.
Lab: Weightage for lab work (e.g., 20%)
Final Assessment: End-of-semester assessments.
Final: Weightage for final exam (e.g., 20%)
Total Weightage
Total (%): The sum of all assessment weightages. This should equal 100%.
Updating Weightage Values
To update any weightage value, simply click inside the input field and enter the new value.
Action: After making changes, click the “Add” or “Save” button to save the updated configuration.
What happens next: The updated weightage will be saved and applied to the course.
7. Exporting Assessment Data
Click the “Export to Excel” button at the bottom of the assessment list.
What happens next: A spreadsheet file will be downloaded containing all assessment configuration data.
8. What to do next?
If you added an assessment configuration: The course will now have a defined grading structure. Teachers can start grading students based on these assessments.
If you updated assessment weightage: The changes will be reflected in student grading and reports.
If you want to manage other configurations: Use the sidebar to navigate to other configuration options.
Tips:
1. The total weightage of all assessments should equal 100%. The system will show “Total (%) 0” if the sum is not 100%.
3. Make sure assessment weightage matches the course’s academic policy and program requirements.
4. Before deleting an assessment configuration, ensure no student grades have been recorded using it. Use “Soft Delete” first to be safe.
User Guide: Academic Approvals
1. Purpose of this Screen
This screen allows you to review and manage academic content approvals in the evERP system. Academic Approvals is where administrators can review, activate, or deactivate academic modules and learning resources before they become available to students. This ensures that all academic content meets quality standards before publication.
2. Step-by-Step Guide (How to Use This Screen)
Step 1: View the Academic Items List
The table shows all academic items pending approval or already published with the following columns:
Module: The name of the academic module or learning resource (e.g., Question Bank, Learning Resources).
Status: Shows the current status of the module:
Deactive: The module is currently inactive and not visible to students.
Active: The module is active and available to students.
Action: This column contains buttons to manage each module.
3. Managing Academic Approvals (The “Action” Column)
To manage an academic module, look at the “Action” column and click the appropriate option:
Activate
What it does: This makes the module active and available to students.
Action: Click the “Activate” button/link.
What happens next: The module status will change to “Active”. Students will now be able to access this module.
Deactivate
What it does: This makes the module inactive and hides it from students.
Action: Click the “Deactivate” button/link.
What happens next: The module status will change to “Deactive”. Students will no longer be able to access this module.
Pending Approvals
What it does: This shows that the module is awaiting approval from the academic committee or administrator.
Action: Click the “Pending Approvals” button/link to review the module details.
What happens next: A detailed view will open where you can review the module content and approve or reject it.
4. What to do next?
If you activated a module: The module will become available to students. They will now be able to access the content.
If you deactivated a module: The module will be hidden from students. This is useful when content needs to be updated or reviewed.
If you are reviewing pending approvals: Review the module content carefully before approving. Ensure all content meets academic quality standards.
Tips:
1. Academic Approvals is a quality control feature. Use it to ensure all academic content meets university standards before publication.
2. Modules in “Pending Approvals” status require your review. Make sure to review them in a timely manner to avoid delays in content availability.
3. When deactivating a module, ensure students are notified in advance if they are currently using it.
4. Keep a record of approvals and rejections for audit purposes.
User Guide: Exams
1. Purpose of this Screen
This screen allows you to review and manage exam-related academic content approvals in the evERP system. Here, administrators can activate, deactivate, or review pending approvals for exam modules before they become available to students. This ensures that all exam content meets quality and security standards before publication.
2. Step-by-Step Guide (How to Use This Screen)
Step 1: View the Exam Modules List
The table shows all exam-related modules with the following columns:
Module: The name of the exam module (e.g., Exams).
Status: Shows the current status of the module:
Active: The module is currently active and available to students.
Deactive: The module is currently inactive and not visible to students.
Pending Approvals: The module is awaiting approval from the academic committee or administrator.
Action: This column contains buttons to manage each module.
3. Managing Exam Approvals (The “Action” Column)
To manage an exam module, look at the “Action” column and click the appropriate option:
Deactivate
What it does: This makes the exam module inactive and hides it from students.
Action: Click the “Deactivate” button/link.
What happens next: The module status will change to “Deactive”. Students will no longer be able to access this exam module.
Pending Approvals
What it does: This shows that the exam module is awaiting approval.
Action: Click the “Pending Approvals” button/link to review the exam module details.
What happens next: A detailed view will open where you can review the exam content and approve or reject it.
4. What to do next?
If you deactivated an exam module: The module will be hidden from students. This is useful when exam content needs to be updated or reviewed.
If you are reviewing pending approvals: Review the exam content carefully before approving. Ensure all exam questions, schedules, and instructions are correct and meet academic standards.
If you want to activate a module: Modules with “Deactive” status can be activated by clicking the “Activate” button (not shown here, but available on other screens).
Tips:
1. Exam modules should only be activated when all exam content is finalized and reviewed.
2. Use “Pending Approvals” status to keep exam content hidden while it is being prepared.
3. Before deactivating an exam module during an ongoing exam session, ensure students are notified in advance.
4. Keep a record of all exam approvals for audit and quality assurance purposes.
Admission Fees
User Guide: Admission Fees Management
1. Purpose of this Screen
This screen allows you to manage admission fees for different programs offered by the university. Admission fees are one-time fees charged to students at the time of admission. From here, you can set admission fee amounts, update them, and manage existing fee records for each program.
2. Admission Fees Main Screen – How to Use
Step 1: Find Specific Admission Fees (Search)
At the top right of the table, you will see a “Search” box.
Action: Type any keyword (like program name or fee amount) into this box and press Enter. The table will automatically filter to show only matching admission fee records.
Step 2: Change How Many Records You See
Next to the Search box, you will see a dropdown that says “Show Entries: 10”.
Action: Click this dropdown and select a number (e.g., 25, 50, or 100). This controls how many admission fee records are displayed on one page.
Step 3: View the Admission Fees List
The main table shows you all admission fee records with the following columns:
Sr. No.: The serial number of the admission fee record.
Program/Degree Name: The program for which the admission fee is set.
Fees: The admission fee amount in PKR.
Due Date: The date by which the admission fee must be paid.
Action: This column contains buttons to manage each admission fee record.
4. Managing Admission Fees (The “Action” Column)
To manage an admission fee record, look at the “Action” column and click the appropriate option:
Update Admission Fee
What it does: Allows you to edit the admission fee amount or due date for a program.
Action: Click the “Update Admission Fee” button/link.
What happens next: You will be taken to an edit form where you can make changes. Click “Save” to confirm.
Soft Delete
What it does: This hides the admission fee record from the main list. It is not permanently removed.
Action: Click the “Soft Delete” button/link.
What happens next: A confirmation message will pop up. Click “Yes” to confirm.
Hard Delete
What it does: This permanently removes the admission fee record from the system. Warning: This action cannot be undone.
Action: Click the “Hard Delete” button/link.
What happens next: A confirmation message will pop up warning you that this is permanent. Click “Yes” only if you are absolutely sure.
5. Adding a New Admission Fee
Step 1: Click Add Admissions Fee
Look for the “Add Admissions Fee” or “Add Fee” button at the top of the page.
Action: Click the “Add Admissions Fee” button.
Step 2: Select Program/Degree Name
Look for the “Program/Degree Name *” dropdown field.
Action: Select the program for which you want to set the admission fee.
Step 3: Enter Fee Amount
Look for the “Amount *” field.
Action: Enter the admission fee amount in PKR (e.g., 15,000).
Step 4: Set Due Date
Look for the “Due Date *” field.
Action: Select the due date using the date picker (format: mm/dd/yyyy).
Step 5: Save the Admission Fee
Action: After filling in all details, click the “Add Fee” button.
What happens next: The admission fee will be saved and will appear in the admission fees list.
6. Exporting Admission Fee Data
Click the “Export to Excel” button at the bottom of the admission fee list.
What happens next: A spreadsheet file will be downloaded containing all admission fee data.
7. What to do next?
If you added an admission fee: The fee will appear in the list. Students applying to that program will now see the admission fee amount.
If you updated an admission fee: The changes will be reflected immediately in student applications.
If you want to manage other fee types: Use the sidebar to navigate to other fee sections like Course Fees, Other Fees, or Fines.
Tips:
1. Admission fees are one-time charges. Make sure the amount is correct before saving.
2. Different programs may have different admission fees. Set them accordingly.
3. The due date should be set based on your university’s admission schedule.
4. Before deleting an admission fee, ensure no students have been admitted using that fee amount. Use “Soft Delete” first to be safe.
Course Fees
User Guide: Course Fees Management
1. Purpose of this Screen
This screen allows you to manage course fees for different courses offered in the evERP system. Course fees are per-course charges that students pay in addition to tuition fees. From here, you can set course fee amounts, update them, and manage existing course fee records for each course.
2. Course Fees Main Screen – How to Use
Step 1: Find Specific Course Fees (Search)
At the top right of the table, you will see a “Search” box.
Action: Type any keyword (like program name, course name, or fee amount) into this box and press Enter. The table will automatically filter to show only matching course fee records.
Step 2: Change How Many Records You See
Next to the Search box, you will see a dropdown that says “Show Entries: 10”.
Action: Click this dropdown and select a number (e.g., 25, 50, or 100). This controls how many course fee records are displayed on one page.
Step 3: View the Course Fees List
The main table shows you all course fee records with the following columns:
Sr. No.: The serial number of the course fee record.
Program/Degree Name: The program to which the course belongs.
Semester Name: The semester in which the course is offered.
Course Name: The name of the course.
Fees: The course fee amount in PKR.
Action: This column contains buttons to manage each course fee record.
4. Managing Course Fees (The “Action” Column)
To manage a course fee record, look at the “Action” column and click the appropriate option:
Update Course Fee
What it does: Allows you to edit the course fee amount for a specific course.
Action: Click the “Update Course Fee” button/link.
What happens next: You will be taken to an edit form where you can make changes. Click “Save” to confirm.
Soft Delete
What it does: This hides the course fee record from the main list. It is not permanently removed.
Action: Click the “Soft Delete” button/link.
What happens next: A confirmation message will pop up. Click “Yes” to confirm.
Hard Delete
What it does: This permanently removes the course fee record from the system. Warning: This action cannot be undone.
Action: Click the “Hard Delete” button/link.
What happens next: A confirmation message will pop up warning you that this is permanent. Click “Yes” only if you are absolutely sure.
5. Adding a New Course Fee
Step 1: Click Add Course Fee
Look for the “Add Course Fee” button at the top of the page.
Action: Click the “Add Course Fee” button.
Step 2: Select Faculty
Look for the “Faculty *” dropdown field.
Action: Select the faculty to which the course belongs.
Step 3: Select Program/Degree
Look for the “Program/Degree *” dropdown field.
Action: Select the program to which the course belongs.
Step 4: Select Semester
Look for the “Semester *” dropdown field.
Action: Select the semester in which the course is offered.
Step 5: Select Course
Look for the “Course *” dropdown field.
Action: Select the course for which you want to set the fee.
Step 6: Enter Fee Amount
Look for the “Amount *” field.
Action: Enter the course fee amount in PKR (e.g., 6,000, 15,000).
Step 7: Save the Course Fee
Action: After filling in all details, click the “Add Fee” button.
What happens next: The course fee will be saved and will appear in the course fees list.
6. Exporting Course Fee Data
Click the “Export to Excel” button at the bottom of the course fee list.
What happens next: A spreadsheet file will be downloaded containing all course fee data.
7. What to do next?
If you added a course fee: The fee will appear in the list. Students enrolled in that course will now see the course fee amount.
If you updated a course fee: The changes will be reflected immediately in student fee records.
If you want to manage other fee types: Use the sidebar to navigate to other fee sections like Admission Fees, Other Fees, or Fines.
Tips:
1. Course fees are per-course charges. Different courses may have different fee amounts.
2. Make sure the faculty, program, semester, and course selections are correct before saving.
3. Course fees are typically charged in addition to tuition fees.
4. Before deleting a course fee, ensure no students are currently enrolled in that course. Use “Soft Delete” first to be safe.
Other Fees
User Guide: Other Fees Management
1. Purpose of this Screen
This screen allows you to manage other fees charged to students in addition to admission and course fees. Other fees can include charges like transport fees, library fees, lab fees, sports fees, or any other miscellaneous charges. From here, you can set, update, and manage these additional fee records for each program.
2. Other Fees Main Screen – How to Use
Step 1: Find Specific Other Fees (Search)
At the top right of the table, you will see a “Search” box.
Action: Type any keyword (like program name, head, or fee amount) into this box and press Enter. The table will automatically filter to show only matching other fee records.
Step 2: Change How Many Records You See
Next to the Search box, you will see a dropdown that says “Show Entries: 10”.
Action: Click this dropdown and select a number (e.g., 25, 50, or 100). This controls how many other fee records are displayed on one page.
Step 3: View the Other Fees List
The main table shows you all other fee records with the following columns:
Sr. No.: The serial number of the other fee record.
Program/Degree Name: The program to which the fee applies.
Head: The fee category or head (e.g., Transport Charges, Library Fee, Lab Fee).
Fees: The fee amount in PKR.
Due Date: The date by which the fee must be paid.
Action: This column contains buttons to manage each other fee record.
4. Managing Other Fees (The “Action” Column)
To manage an other fee record, look at the “Action” column and click the appropriate option:
Update Other Fee
What it does: Allows you to edit the fee head, amount, or due date for a specific program.
Action: Click the “Update Other Fee” button/link.
What happens next: You will be taken to an edit form where you can make changes. Click “Save” to confirm.
Soft Delete
What it does: This hides the other fee record from the main list. It is not permanently removed.
Action: Click the “Soft Delete” button/link.
What happens next: A confirmation message will pop up. Click “Yes” to confirm.
Hard Delete
What it does: This permanently removes the other fee record from the system. Warning: This action cannot be undone.
Action: Click the “Hard Delete” button/link.
What happens next: A confirmation message will pop up warning you that this is permanent. Click “Yes” only if you are absolutely sure.
5. Adding a New Other Fee
Step 1: Click Add Other Fee
Look for the “Add Other Fee” button at the top of the page.
Action: Click the “Add Other Fee” button.
Step 2: Select Faculty
Look for the “Faculty *” dropdown field.
Action: Select the faculty to which the program belongs.
Step 3: Select Program/Degree
Look for the “Program/Degree *” dropdown field.
Action: Select the program to which the other fee applies.
Step 4: Enter Fee Head
Look for the “Head *” field.
Action: Enter the fee category or head name (e.g., “Transport Charges”, “Library Fee”, “Lab Fee”, “Sports Fee”).
Step 5: Enter Fee Amount
Look for the “Amount *” field.
Action: Enter the fee amount in PKR (e.g., 2,000, 7,000).
Step 6: Set Due Date
Look for the “Due Date *” field.
Action: Select the due date using the date picker (format: mm/dd/yyyy).
Step 7: Save the Other Fee
Action: After filling in all details, click the “Add Fee” button.
What happens next: The other fee will be saved and will appear in the other fees list.
6. Common Other Fee Categories
Fee Head
Description
Typical Amount
Transport Charges
Transportation services provided to students
7,000 PKR
Library Fee
Access to university library resources
2,000 PKR
Lab Fee
Access to computer or science labs
3,000 PKR
Sports Fee
Access to sports facilities and activities
1,500 PKR
Medical Fee
Access to university medical facilities
1,000 PKR
7. Exporting Other Fee Data
Click the “Export to Excel” button at the bottom of the other fee list.
What happens next: A spreadsheet file will be downloaded containing all other fee data.
8. What to do next?
If you added an other fee: The fee will appear in the list. Students enrolled in that program will now see the fee in their fee structure.
If you updated an other fee: The changes will be reflected immediately in student fee records.
If you want to manage other fee types: Use the sidebar to navigate to other fee sections like Admission Fees, Course Fees, or Fines.
Tips:
1. Use clear and recognizable heads for other fees (e.g., “Transport Charges” instead of just “Fee 1”).
2. Different programs may have different other fees. Set them accordingly based on program requirements.
3. The due date should be set based on your university’s fee collection schedule.
4. Before deleting an other fee, ensure no students have been charged that fee. Use “Soft Delete” first to be safe.
Fine
User Guide: Fines Management
1. Purpose of this Screen
This screen allows you to manage fines charged to students in the evERP system. Fines are penalty charges applied to students for various reasons such as late fee payment, library book returns, disciplinary actions, or other violations. From here, you can set, update, and manage fine amounts for different programs.
2. Fines Main Screen – How to Use
Step 1: Find Specific Fines (Search)
At the top right of the table, you will see a “Search” box.
Action: Type any keyword (like program name, head, or amount) into this box and press Enter. The table will automatically filter to show only matching fine records.
Step 2: Change How Many Records You See
Next to the Search box, you will see a dropdown that says “Show Entries: 10”.
Action: Click this dropdown and select a number (e.g., 25, 50, or 100). This controls how many fine records are displayed on one page.
Step 3: View the Fines List
The main table shows you all fine records with the following columns:
Sr. No.: The serial number of the fine record.
Program/Degree Name: The program to which the fine applies.
Head: The fine category or head (e.g., Fee Fine, Library Fine, Disciplinary Fine).
Amount: The fine amount in PKR.
Action: This column contains buttons to manage each fine record.
4. Managing Fines (The “Action” Column)
To manage a fine record, look at the “Action” column and click the appropriate option:
Update Fine
What it does: Allows you to edit the fine amount or head for a specific program.
Action: Click the “Update Fine” button/link.
What happens next: You will be taken to an edit form where you can make changes. Click “Save” to confirm.
Soft Delete
What it does: This hides the fine record from the main list. It is not permanently removed.
Action: Click the “Soft Delete” button/link.
What happens next: A confirmation message will pop up. Click “Yes” to confirm.
Hard Delete
What it does: This permanently removes the fine record from the system. Warning: This action cannot be undone.
Action: Click the “Hard Delete” button/link.
What happens next: A confirmation message will pop up warning you that this is permanent. Click “Yes” only if you are absolutely sure.
5. Adding a New Fine
Step 1: Click Add Fine
Look for the “Add Fine” button at the top of the page.
Action: Click the “Add Fine” button.
Step 2: Select Faculty
Look for the “Faculty *” dropdown field.
Action: Select the faculty to which the program belongs.
Step 3: Select Program/Degree
Look for the “Program/Degree *” dropdown field.
Action: Select the program to which the fine applies.
Step 4: Enter Fine Head
Look for the “Head” field.
Action: Enter the fine category or head name (e.g., “Fee Fine”, “Library Fine”, “Disciplinary Fine”).
Step 5: Enter Fine Amount
Look for the “Amount *” field.
Action: Enter the fine amount in PKR (e.g., 50, 10).
Step 6: Save the Fine
Action: After filling in all details, click the “Add Fine” button.
What happens next: The fine will be saved and will appear in the fines list.
6. Common Fine Categories
Fine Head
Description
Typical Amount
Fee Fine
Penalty for late fee payment
50 PKR
Library Fine
Penalty for late book returns or lost books
100 PKR
Disciplinary Fine
Penalty for disciplinary violations
500 PKR
7. Exporting Fine Data
Click the “Export to Excel” button at the bottom of the fines list.
What happens next: A spreadsheet file will be downloaded containing all fine data.
8. What to do next?
If you added a fine: The fine will appear in the list. Students will be notified of the fine as applicable.
If you updated a fine: The changes will be reflected immediately in student fine records.
If you want to manage other fee types: Use the sidebar to navigate to other fee sections like Admission Fees, Course Fees, or Other Fees.
Tips:
1. Fines are penalty charges, so use them appropriately and ensure students are notified.
2. Different programs may have different fine amounts. Set them accordingly.
3. Use clear and descriptive heads for fines (e.g., “Fee Fine” instead of just “Fine”).
4. Before deleting a fine, ensure no students have been charged that fine. Use “Soft Delete” first to be safe.
User Guide: Promotion Management
1. Purpose of this Screen
This screen allows you to manage student promotions from one semester to the next in the evERP system. Promotion is the process of moving students from their current semester to the next semester. This is a critical academic function that happens at the end of each semester. From here, you can create promotion schedules, update them, and manage existing promotion records.
2. Promotion Main Screen – How to Use
Step 1: Find Specific Promotions (Search)
At the top right of the table, you will see a “Search” box.
Action: Type any keyword (like program name or semester) into this box and press Enter. The table will automatically filter to show only matching promotion records.
Step 2: Change How Many Records You See
Next to the Search box, you will see a dropdown that says “Show Entries: 10”.
Action: Click this dropdown and select a number (e.g., 25, 50, or 100). This controls how many promotion records are displayed on one page.
Step 3: View the Promotion List
The main table shows you all promotion records with the following columns:
Sr. No.: The serial number of the promotion record.
Program: The program for which the promotion is configured.
Old Semester: The semester from which students will be promoted.
New Semester: The semester to which students will be promoted.
Start Date: The date when the promotion process starts.
End Date: The date when the promotion process ends.
Action: This column contains buttons to manage each promotion record.
4. Managing Promotions (The “Action” Column)
To manage a promotion record, look at the “Action” column and click the appropriate option:
Update Promotion
What it does: Allows you to edit the promotion details (e.g., change dates or semester).
Action: Click the “Update Promotion” button/link.
What happens next: You will be taken to an edit form where you can make changes. Click “Save” to confirm.
Soft Delete
What it does: This hides the promotion record from the main list. It is not permanently removed.
Action: Click the “Soft Delete” button/link.
What happens next: A confirmation message will pop up. Click “Yes” to confirm.
Hard Delete
What it does: This permanently removes the promotion record from the system. Warning: This action cannot be undone.
Action: Click the “Hard Delete” button/link.
What happens next: A confirmation message will pop up warning you that this is permanent. Click “Yes” only if you are absolutely sure.
5. Adding a New Promotion
Step 1: Click Add Promotion
Look for the “Add Promotion” button at the top of the page.
Action: Click the “Add Promotion” button.
Step 2: Select Faculty
Look for the “Faculty” dropdown field.
Action: Select the faculty to which the program belongs.
Step 3: Select Program
Look for the “Program *” dropdown field.
Action: Select the program for which you want to configure promotion.
Step 4: Select Old Semester
Look for the “Old Semester *” dropdown field.
Action: Select the semester from which students will be promoted.
Step 5: Select New Semester
Look for the “New Semester *” dropdown field.
Action: Select the semester to which students will be promoted.
Step 6: Set Promotion Dates
Start Date *: Select the date when the promotion process starts (format: mm/dd/yyyy).
End Date *: Select the date when the promotion process ends (format: mm/dd/yyyy).
Step 7: Save the Promotion
Action: After filling in all details, click the “Add Promotion” or “Save” button.
What happens next: The promotion record will be saved and will appear in the promotions list.
6. Exporting Promotion Data
Click the “Export to Excel” button at the bottom of the promotion list.
What happens next: A spreadsheet file will be downloaded containing all promotion data.
7. What to do next?
If you added a promotion: The promotion record will appear in the list. Students will be promoted according to the schedule.
If you updated a promotion: The changes will be reflected immediately in student promotion schedules.
If you want to manage other configurations: Use the sidebar to navigate to other configuration options.
Tips:
1. Promotion should be configured before the end of the semester to allow smooth transition.
2. Ensure the “Old Semester” and “New Semester” are correctly selected to avoid promotion errors.
3. Set realistic start and end dates for the promotion process. Allow enough time for administration to process all students.
4. Before deleting a promotion, ensure no students have been promoted using that record. Use “Soft Delete” first to be safe.
User Guide: Email Configuration Management
1. Purpose of this Screen
This screen allows you to configure email accounts for different departments in the evERP system. Email configurations are used to send automated emails from the system to students, faculty, and staff. Each department (e.g., Admissions, Accounts, Academics) can have its own email account with specific credentials for sending department-specific communications.
2. Email Main Screen – How to Use
Step 1: Find Specific Email Configurations (Search)
At the top right of the table, you will see a “Search” box.
Action: Type any keyword (like email ID or faculty name) into this box and press Enter. The table will automatically filter to show only matching email configurations.
Step 2: Change How Many Records You See
Next to the Search box, you will see a dropdown that says “Show Entries: 10”.
Action: Click this dropdown and select a number (e.g., 25, 50, or 100). This controls how many email configurations are displayed on one page.
Step 3: View the Email List
The main table shows you all email configurations with the following columns:
Sr. No.: The serial number of the email configuration.
Email ID: The email address configured for the department.
Faculty: The department using this email (e.g., Admissions Dept, Accounts Dept, Academics Dept).
Action: This column contains buttons to manage each email configuration.
4. Managing Email Configurations (The “Action” Column)
To manage an email configuration, look at the “Action” column and click the appropriate option:
Update Email Config.
What it does: Allows you to edit the email address or password for a department.
Action: Click the “Update Email Config.” button/link.
What happens next: The Update Email Configuration screen will open where you can make changes.
Soft Delete
What it does: This hides the email configuration from the main list. It is not permanently removed.
Action: Click the “Soft Delete” button/link.
What happens next: A confirmation message will pop up. Click “Yes” to confirm.
Hard Delete
What it does: This permanently removes the email configuration from the system. Warning: This action cannot be undone.
Action: Click the “Hard Delete” button/link.
What happens next: A confirmation message will pop up warning you that this is permanent. Click “Yes” only if you are absolutely sure.
5. Adding a New Email Configuration
Step 1: Click Add Email
Look for the “Add Email” button at the top of the page.
Action: Click the “Add Email” button.
Step 2: Select Faculty/Department
Look for the “Faculty *” dropdown field.
Action: Select the department for which you want to configure email (e.g., Admissions Dept, Accounts Dept, Academics Dept).
Step 3: Enter Email ID
Look for the “Email ID *” field.
Action: Enter the email address for the department (e.g., admission@gmail.com).
Step 4: Enter Password
Look for the “Password *” field.
Action: Enter the password for the email account.
Step 5: Save the Email Configuration
Action: After filling in all details, click the “Add Email” button.
What happens next: The email configuration will be saved and will appear in the email list.
6. Update Email Configuration Screen
Purpose
This screen allows you to edit an existing email configuration. You can update the email address or change the password for a department’s email account.
Step-by-Step Guide
Step 1: View Current Configuration
The form will display the current settings:
Faculty: The department name (e.g., Admissions).
Email: The current email address (e.g., admission@gmail.com).
Step 2: Update Email Address
Look for the “Email *” field.
Action: Type the new email address if you need to change it.
Step 3: Update Password
Look for the “New Password (leave blank to keep current) *” field.
Action: Enter the new password if you want to change it. Leave blank to keep the current password.
Step 4: Save Changes
Action: Click the “Update Email” button.
What happens next: The email configuration will be updated with the new details.
7. Department Email Configurations
Department
Email Purpose
Example Email
Admissions Dept
Send admission-related communications
admission@gmail.com
Accounts Dept
Send fee and financial communications
accounts@gmail.com
Academics Dept
Send academic-related communications
academics@gmail.com
and more…
8. Exporting Email Data
Click the “Export to Excel” button at the bottom of the email list.
What happens next: A spreadsheet file will be downloaded containing all email configuration data.
9. What to do next?
If you added an email configuration: The email will be available for sending automated emails from that department.
If you updated an email configuration: The changes will be reflected in all outgoing emails from that department.
If you want to send emails: Use the Communication > Emails > Send Emails section to send emails using these configured accounts.
Tips:
1. Each department should have its own email account to maintain proper communication records.
2. Keep email passwords secure. Only authorized personnel should know the passwords.
3. Use professional email addresses (e.g., admission@university.edu) instead of personal emails.
4. Before deleting an email configuration, ensure no communication is pending from that department. Use “Soft Delete” first to be safe.
User Guide: Zoom Configuration Management
1. Purpose of this Screen
This screen allows you to configure Zoom accounts for users in the evERP system. Zoom integration enables teachers and administrators to conduct live online classes directly from the system. By configuring Zoom accounts, users can create and manage Zoom meetings seamlessly within evERP.
2. Zoom Configuration Main Screen – How to Use
Step 1: Find Specific Zoom Configurations (Search)
At the top right of the table, you will see a “Search” box.
Action: Type any keyword (like username or Zoom account ID) into this box and press Enter. The table will automatically filter to show only matching Zoom configurations.
Step 2: Change How Many Records You See
Next to the Search box, you will see a dropdown that says “Show Entries: 10”.
Action: Click this dropdown and select a number (e.g., 25, 50, or 100). This controls how many Zoom configurations are displayed on one page.
Step 3: View the Zoom Configuration List
The main table shows you all Zoom configurations with the following columns:
Sr. No.: The serial number of the Zoom configuration.
UserName: The name of the user with Zoom configured.
Zoom Account ID: The Zoom account ID for the user.
Zoom Client ID: The Zoom Client ID for the user.
Zoom Client Secret: The Zoom Client Secret for the user.
Action: This column contains buttons to manage each Zoom configuration.
4. Managing Zoom Configurations (The “Action” Column)
To manage a Zoom configuration, look at the “Action” column and click the appropriate option:
Update Zoom Config
What it does: Allows you to edit the Zoom configuration details for a user.
Action: Click the “Update Zoom Config” button/link.
What happens next: You will be taken to an edit form where you can make changes. Click “Save” to confirm.
Soft Delete
What it does: This hides the Zoom configuration from the main list. It is not permanently removed.
Action: Click the “Soft Delete” button/link.
What happens next: A confirmation message will pop up. Click “Yes” to confirm.
Hard Delete
What it does: This permanently removes the Zoom configuration from the system. Warning: This action cannot be undone.
Action: Click the “Hard Delete” button/link.
What happens next: A confirmation message will pop up warning you that this is permanent. Click “Yes” only if you are absolutely sure.
5. Adding a New Zoom Configuration
Step 1: Click Configure User or Add Zoom Configuration
Look for the “Configure User” or “Add Zoom Configuration” button at the top of the page.
Action: Click the button to add a new Zoom configuration.
Step 2: Select User
Look for the “User *” dropdown field.
Action: Select the user for whom you want to configure Zoom.
Step 3: Enter Zoom Account ID
Look for the “Zoom Account ID *” field.
Action: Enter the Zoom Account ID for the user.
Step 4: Enter Zoom Client ID
Look for the “Zoom Client ID *” field.
Action: Enter the Zoom Client ID for the user.
Step 5: Enter Zoom Client Secret
Look for the “Zoom Client Secret *” field.
Action: Enter the Zoom Client Secret for the user.
Step 6: Save the Zoom Configuration
Action: After filling in all details, click the “Configure User” or “Save” button.
What happens next: The Zoom configuration will be saved and will appear in the Zoom configuration list.
6. Exporting Zoom Data
Click the “Export to Excel” button at the bottom of the Zoom configuration list.
What happens next: A spreadsheet file will be downloaded containing all Zoom configuration data.
7. What to do next?
If you added a Zoom configuration: The user will now be able to create Zoom meetings from within evERP.
If you updated a Zoom configuration: The changes will be reflected in all Zoom meetings created by that user.
If you want to configure other users: Add more Zoom configurations for other teachers or staff members.
Tips:
1. Each teacher who needs to conduct live classes should have their own Zoom configuration.
2. Keep Zoom credentials secure. Client Secret should be treated as confidential information.
3. Verify Zoom credentials are correct before saving. Incorrect credentials will prevent Zoom meetings from being created.
4. Before deleting a Zoom configuration, ensure no scheduled meetings are using it. Use “Soft Delete” first to be safe.
User Guide: Rules & Regulations Management
1. Purpose of this Screen
This screen allows you to manage rules, regulations, policies, services, and guidelines for the university in the evERP system. From here, you can create, update, and publish institutional policies, student services information, and instructional guidelines. These documents are displayed to students and staff to ensure everyone is aware of university rules and available services.
2. Policies Management
Purpose
This section allows you to create and manage institutional policies. Policies are official rules and regulations that govern the university, such as fee policies, hostel rules, and student support policies.
Step-by-Step Guide
Step 1: View Existing Policies
At the top of the policies section, you will see a “Search” box and a “Refresh” button.
Action: Type a keyword to search for a specific policy or click “Refresh” to update the list.
Step 2: Add a New Policy
Look for the “Add Policy” button.
Action: Click the “Add Policy” button.
Step 3: Enter Policy Details
Look for the “Policy Name *” field.
Action: Enter the name of the policy (e.g., “Fees Terms”, “Merit/Financial Aid”, “Hostel Rules”, “Sponsor a Student”).
Step 4: Add Policy Content
Use the text editor to enter the full policy content.
You can format text using options like Bold, Italic, Underline, headings, and alignment.
Action: Click the “Add Policy” button to save.
What happens next: The policy will be saved and appear in the policies list. It will be visible to students and staff on their side.
3. Services Management
Purpose
This section allows you to manage student services information. Services include support programs, accommodation statements, and other student facilitation services offered by the university.
Step-by-Step Guide
Step 1: View Service Details
The service editor shows the service content with formatting options.
Action: Use the toolbar to edit the service content.
Step 2: Edit Service Content
Action: Type or paste the service information in the editor.
Use formatting options like Bold, Italic, Underline, font size, and alignment.
Step 3: Set Service Status
Look for the “Service Status” option.
Action: Set to “Active” to make the service visible, or “Inactive” to hide it.
Step 4: Set Visibility
Look for the “Show on Student Side” option.
Action: Check this box to make the service visible to students.
Step 5: Save the Service
Action: Click the “Update” button to save changes.
Bahria University is committed to providing an inclusive and supportive learning environment for all students.
Students with disabilities, learning difficulties, or any other condition requiring accommodation should inform the Student Coordinator at the time of admission.
All requests are treated confidentially.
Accommodations are made on a case-by-case basis to ensure equity while maintaining academic standards.
To request accommodations: Email support@bahria.edu.pk or visit the LMS Portal Services Tab.
4. Instructions & Guidelines Management
Purpose
This section allows you to manage instructional guidelines and documents. These include data protection policies, privacy guidelines, security information, and other important instructions for students and staff.
Step-by-Step Guide
Step 1: Search for a Specific Guideline
At the top of the instructions section, you will see a “Search” box.
Action: Type a keyword to search for specific guidelines.
Step 2: Edit Guideline Content
Use the text editor to create or edit guideline content.
Use formatting options like Bold, Italic, Underline, headings, lists, and alignment.
Step 3: Save the Guideline
Action: Click the “Update” or “Save” button to save changes.
Example: Data Protection and Privacy Guidelines
1. Secure Transactions in LMS/ERP
Our LMS/ERP is built with advanced security mechanisms to safeguard financial and sensitive data from cyber threats, fraud, and unauthorized access.
These security features enhance trust and data integrity for all transactions processed through our platform.
1.1 Key Security Features in LMS/ERP
Tokenization: Sensitive data is replaced with unique identifiers to minimize exposure and enhance security.
Multi-Factor Authentication (MFA): Users are required to verify their identities using multiple authentication methods for added security.
Secure Payment Gateway Integration: Our LMS/ERP integrates with Stripe, ensuring all transactions pass through a PCI-DSS-compliant, encrypted payment processor.
Real-time Security Monitoring: Continuous monitoring and logging of transaction activities to identify and mitigate potential security threats.
Regulatory Compliance in LMS/ERP
Our LMS/ERP is fully compliant with international security regulations and standards, ensuring that all data privacy and protection guidelines are met.
As an education portal designed for universities, our platform ensures compliance with industry-specific regulations.
5. What to do next?
If you added a policy: The policy will appear in the policies list and become visible to students and staff.
If you updated a service: The changes will be reflected on the student portal.
If you created guidelines: The guidelines will be available for students and staff to view.
If you want to manage other configurations: Use the sidebar to navigate to other configuration options.
Tips:
1. Use clear and descriptive names for policies so students can easily find them.
2. Keep service information up to date, especially contact details like email addresses and phone numbers.
3. For guidelines, use headings and bullet points to make content easy to read.
4. Only make services “Active” when they are ready to be displayed to students.
5. Review policies, services, and guidelines regularly to ensure they remain current and relevant.
User Guide: Import Data
1. Purpose of this Screen
This screen allows you to import bulk data into the evERP system using Excel files. Instead of adding students or fees one by one, you can upload a properly formatted Excel file to import multiple records at once. This saves time and reduces manual data entry errors.
2. Important Instructions Before Importing
General Guidelines
Detailed import instructions are provided for each module section.
Make sure you read the specific instructions for the type of data you are importing.
All columns in the Excel file must be filled; they are all compulsory.
Fields that contain more than one value must be separated by a comma (,).
Use the provided Excel template format to ensure successful import.
3. Step-by-Step Guide (How to Import Data)
Step 1: Prepare Your Excel File
Download the import template for the specific data type (e.g., Student Import, Fees Import).
Open the template in Microsoft Excel or any compatible spreadsheet software.
Fill in all the required columns with your data.
Important: Do not change the column headers or order.
Important: All fields are compulsory. Do not leave any column empty.
Step 2: Review Your Data
Double-check all entries for accuracy.
If a field contains multiple values, separate them with a comma (e.g., “Math, English, Science”).
Ensure dates are in the correct format (e.g., mm/dd/yyyy).
Remove any extra spaces or special characters that may cause errors.
Step 3: Select the Import Type
On the Import Data screen, you will see different import sections:
Student Import: For importing student records.
Fees Import: For importing fee records.
Step 4: Upload Your Excel File
Click the “Choose File” button next to the relevant import section.
Browse and select your prepared Excel file from your computer.
Action: Click “Upload” or “Import” to start the import process.
Step 5: Confirm Import
The system will process the file and validate the data.
If the file format is correct, the data will be imported into the system.
If there are errors, the system will display a message showing which rows need correction.
Fix the errors in the Excel file and try uploading again.
Step 6: Verify Imported Data
After successful import, navigate to the relevant section (e.g., Students, Fees) to verify the data.
Check a few records to ensure all information was imported correctly.
4. File Format Guidelines
Student Import File Format
Column
Description
Example
Full Name
Student’s complete name
Ali Khan
Father’s Name
Student’s father’s name
Ahmed Khan
Roll No
Student’s roll number
5555111
Email
Student’s email address
ali@email.com
Mobile No
Student’s mobile number
923000000002
Program
Program name
BSIT Program
Semester
Semester name
Semester 1
Fees Import File Format
Column
Description
Example
Student Roll No
Student’s roll number
5555111
Fee Type
Type of fee
Tuition Fee
Amount
Fee amount
15000
Due Date
Payment due date
06/18/2026
5. Common Import Errors and Solutions
Error Message
Cause
Solution
Invalid file format
File is not in Excel format
Save file as .xlsx format
Column mismatch
Column headers do not match template
Use the exact template format
Missing required field
A compulsory field is empty
Fill all fields
Invalid date format
Date is not in correct format
Use mm/dd/yyyy format
6. What to do next?
If you imported student data: Navigate to the Students section to verify all records are imported correctly.
If you imported fee data: Navigate to the Fees section to verify all fee records are imported correctly.
If you encountered errors: Correct the errors in your Excel file and try uploading again.
Tips:
1. Always use the download template provided by the system for each import type.
2. Do not change the column headers or their order in the Excel file.
3. For fields with multiple values (e.g., courses), separate them with a comma (,) without spaces.
4. Test your import file with a small number of records first before importing the entire dataset.
5. Keep a backup copy of your original data before importing, in case you need to revert changes.
User Guide: Import Data
1. Purpose of this Screen
This screen allows you to import bulk data into the evERP system using Excel files. Instead of adding students or fees one by one, you can upload a properly formatted Excel file to import multiple records at once. This saves time and reduces manual data entry errors.
2. Important Instructions Before Importing
General Guidelines
Detailed import instructions are provided for each module section.
Make sure you read the specific instructions for the type of data you are importing.
All columns in the Excel file must be filled; they are all compulsory.
Fields that contain more than one value must be separated by a comma (,).
Use the provided Excel template format to ensure successful import.
3. Step-by-Step Guide (How to Import Data)
Step 1: Prepare Your Excel File
Download the import template for the specific data type (e.g., Student Import, Fees Import).
Open the template in Microsoft Excel or any compatible spreadsheet software.
Fill in all the required columns with your data.
Important: Do not change the column headers or order.
Important: All fields are compulsory. Do not leave any column empty.
Step 2: Review Your Data
Double-check all entries for accuracy.
If a field contains multiple values, separate them with a comma (e.g., “Math, English, Science”).
Ensure dates are in the correct format (e.g., mm/dd/yyyy).
Remove any extra spaces or special characters that may cause errors.
Step 3: Select the Import Type
On the Import Data screen, you will see different import sections:
Student Import: For importing student records.
Fees Import: For importing fee records.
Step 4: Upload Your Excel File
Click the “Choose File” button next to the relevant import section.
Browse and select your prepared Excel file from your computer.
Action: Click “Upload” or “Import” to start the import process.
Step 5: Confirm Import
The system will process the file and validate the data.
If the file format is correct, the data will be imported into the system.
If there are errors, the system will display a message showing which rows need correction.
Fix the errors in the Excel file and try uploading again.
Step 6: Verify Imported Data
After successful import, navigate to the relevant section (e.g., Students, Fees) to verify the data.
Check a few records to ensure all information was imported correctly.
4. File Format Guidelines
Student Import File Format
Column
Description
Example
Full Name
Student’s complete name
Ali Khan
Father’s Name
Student’s father’s name
Ahmed Khan
Roll No
Student’s roll number
5555111
Email
Student’s email address
ali@email.com
Mobile No
Student’s mobile number
923000000002
Program
Program name
BSIT Program
Semester
Semester name
Semester 1
Fees Import File Format
Column
Description
Example
Student Roll No
Student’s roll number
5555111
Fee Type
Type of fee
Tuition Fee
Amount
Fee amount
15000
Due Date
Payment due date
06/18/2026
5. Common Import Errors and Solutions
Error Message
Cause
Solution
Invalid file format
File is not in Excel format
Save file as .xlsx format
Column mismatch
Column headers do not match template
Use the exact template format
Missing required field
A compulsory field is empty
Fill all fields
Invalid date format
Date is not in correct format
Use mm/dd/yyyy format
6. What to do next?
If you imported student data: Navigate to the Students section to verify all records are imported correctly.
If you imported fee data: Navigate to the Fees section to verify all fee records are imported correctly.
If you encountered errors: Correct the errors in your Excel file and try uploading again.
Tips:
1. Always use the download template provided by the system for each import type.
2. Do not change the column headers or their order in the Excel file.
3. For fields with multiple values (e.g., courses), separate them with a comma (,) without spaces.
4. Test your import file with a small number of records first before importing the entire dataset.
5. Keep a backup copy of your original data before importing, in case you need to revert changes.
In Process
User Guide: Admissions – Scrutinize
1. Purpose of this Screen
This screen allows you to scrutinize student applications during the admission process. Scrutiny is the review and verification of student documents, academic records, and fee details before final approval. From here, you can view student personal information, academic details, uploaded documents, fee structure, and manage payment plans.
2. In Process Students – How to Use
Step 1: Find a Specific Student (Search)
At the top right of the table, you will see a “Search” box.
Action: Type any keyword (like student name or program name) into this box and press Enter. The table will automatically filter to show only matching students.
Step 2: Change How Many Students You See
Next to the Search box, you will see a dropdown that says “Show Entries: 10”.
Action: Click this dropdown and select a number (e.g., 25, 50, or 100). This controls how many students are displayed on one page.
Step 3: View the Student List
The main table shows you all in-process students with the following columns:
Sr. No.: The serial number of the student.
Program/Degree Name: The program the student applied for.
Admission Model: The admission model (e.g., On Campus).
Admission Type: The type of admission (e.g., As Per Prospectus).
Study Model: The study model (e.g., BS).
Student Name: The name of the student.
Action: Click the “Scrutinize” button to review the student’s application.
4. Scrutinize Screen – Overview
After clicking “Scrutinize”, you will see the student’s complete application with five tabs:
Details: Personal and academic details.
Documents: Uploaded documents for review.
Fee Structure: Fee breakdown for the program.
Payment Plan: Installment payment schedule.
Fee Summary: Complete fee summary with agreement.
5. Tab 1: Details
Purpose
This tab displays the student’s personal and academic details for verification.
Personal Details
Full Name: Student’s complete name (e.g., Ijaz).
Mobile No.: Student’s contact number (e.g., 923000009298).
CNIC: Student’s CNIC number (e.g., 2485098934234).
Program: The program applied for (e.g., BSIT Program).
Academic Details
Name: Institution name (e.g., Punjab College).
Total Marks: Total marks (e.g., 1000).
Obtained Marks: Marks obtained (e.g., 992).
Percentage: Percentage obtained (e.g., 99%).
GPA: Grade Point Average (e.g., 3.43).
6. Tab 2: Documents
Purpose
This tab displays uploaded documents for the student’s application. You can view each document by clicking the “View” button next to it.
Documents to Review
Student Picture: The student’s photograph.
Educational Documents: Academic transcripts and certificates.
Additional documents as required by the admission criteria.
7. Tab 3: Fee Structure
Purpose
This tab shows the fee breakdown for the student’s program.
Fee Components
Fee Component
Amount (PKR)
Admissions Fees
8,000
Tuition Fees
6,000
Tuition Fees (Scholarship)
0
Other
2,000
Total Fees
16,000
8. Tab 4: Payment Plan
Purpose
This tab allows you to manage the payment plan and create installment schedules for the student.
Admission Fee Payment
Due Date: Select the due date for admission fee (e.g., 04/24/2026).
Amount Due: The admission fee amount is displayed.
Action: Click “Save” to confirm the admission fee schedule.
Installments
Head: Enter the fee head for each installment.
Due Date: Select the due date for each installment.
Amount Due: Enter the amount for each installment.
Action: Click “Create” to add each installment.
9. Tab 5: Fee Summary
Purpose
This tab shows the complete fee summary and requires agreement confirmation before final approval.
Fee Summary
Installment No: The installment number.
Due Date: The due date for each installment.
Amount: The amount for each installment.
Financial Summary
Summary Item
Amount (PKR)
Gross Fees Payable
16,000
Discount
16,000
Net Fees Payable
0
Accept Agreement
Read the agreement statement: “I certify that I have checked the eligibility criteria for the student”.
Action: Check the “Agree” checkbox to confirm.
10. What to do next?
If you completed scrutiny: The student’s application status can be updated to “Approved” or “Rejected”.
If you need to review documents: Click the “View” button in the Documents tab to verify each document.
If you need to adjust fees: Update the fee structure or payment plan as needed.
If you approved the student: The student will be moved to the “Admitted” list and can proceed with enrollment.
Tips:
1. Carefully verify all documents before approving a student’s admission.
2. Ensure the fee structure matches the program’s official fee policy.
3. Check academic details thoroughly to confirm eligibility.
4. The “Agree” checkbox confirms that you have verified all student information.
Rejected
User Guide: Rejected Students
1. Purpose of this Screen
This screen allows you to view and manage rejected student applications in the evERP system. When student applications do not meet the admission criteria or are not approved, they are moved to the Rejected list. From here, you can review rejected applications, view the reasons for rejection, and export the data for record-keeping.
2. Step-by-Step Guide (How to Use This Screen)
Step 1: Find a Specific Rejected Student (Search)
At the top right of the table, you will see a “Search” box.
Action: Type any keyword (like student name or admission model) into this box and press Enter. The table will automatically filter to show only matching rejected students.
Step 2: Change How Many Records You See
Next to the Search box, you will see a dropdown that says “Show Entries: 10”.
Action: Click this dropdown and select a number (e.g., 25, 50, or 100). This controls how many rejected student records are displayed on one page.
Step 3: View the Rejected Students List
The main table shows you all rejected students with the following columns:
Sr. No.: The serial number of the rejected student.
Admission Model: The admission model of the student (e.g., On Campus, Online).
Study Model: The study model of the student (e.g., BS, MS, PhD).
Name: The full name of the student.
Reason: The reason for rejection (e.g., Incomplete documents, Not meeting eligibility criteria, Failed interview).
4. Exporting Rejected Student Data
Click the “Export to Excel” button at the bottom of the table.
What happens next: A spreadsheet file will be downloaded containing all rejected student data. This is useful for reporting, auditing, or record-keeping purposes.
5. Common Reasons for Rejection
Reason for Rejection
Description
Incomplete Documents
Required documents were not submitted or were incomplete.
Not Meeting Eligibility Criteria
Student did not meet the minimum eligibility requirements for the program.
Failed Interview
Student did not pass the admission interview.
Insufficient Academic Record
Student’s academic record did not meet the program’s requirements.
Application Withdrawn
Student withdrew their application voluntarily.
6. What to do next?
If you want to review a rejected student: Check the reason for rejection to understand why the application was not approved.
If the student appeals the decision: You can review the case again and potentially move the student back to “In Process” if new information is provided.
If you want to generate reports: Use the “Export to Excel” feature to create reports for management or audit purposes.
Tips:
1. Always document the clear reason for rejection so that it can be communicated to the student if needed.
2. Rejected students can be reviewed again if they provide additional information or appeal the decision.
3. Export data regularly to maintain a record of rejected applications for reporting and audit purposes.
User Guide: Admission by Management
1. Purpose of this Screen
This screen allows administrators to manually add and manage student admissions through the system. Instead of students applying themselves, management can create student accounts, fill in their details, configure fee structures, and complete the admission process on behalf of the student.
2. Admission by Management – Complete Process Overview
The process involves the following steps:
Add New Student: Click “New Student” to begin.
Basic Signup Details: Enter student’s personal and contact information.
Fee Structure: Configure the fee structure for the student.
Payment Plan: Set up the payment plan and installments.
Fee Summary: Review and finalize the admission.
3. Step 1: Student List – How to Use
Step 1.1: Find a Specific Student (Search)
At the top right of the table, you will see a “Search” box.
Action: Type any keyword (like student name, email, or login ID) into this box and press Enter. The table will automatically filter to show only matching students.
Step 1.2: Change How Many Students You See
Next to the Search box, you will see a dropdown that says “Show Entries: 10”.
Action: Click this dropdown and select a number (e.g., 25, 50, or 100). This controls how many students are displayed on one page.
Step 1.3: View the Student List
The main table shows you all students with the following columns:
Sr. No.: The serial number of the student.
Full Name: The student’s complete name.
Mobile No.: The student’s contact number.
Email: The student’s email address.
Status: The current status of the student (e.g., Documents Uploaded).
Login ID: The student’s system login ID.
Action: This column contains buttons to manage each student.
Step 1.4: Managing Students (The “Action” Column)
To manage a student, look at the “Action” column and click the appropriate option:
Continue
What it does: Continues the admission process for the student. Click this to proceed to the next step.
Action: Click the “Continue” button/link.
What happens next: You will be taken to the Basic Signup Details screen.
Hard Delete
What it does: Permanently removes the student record from the system. Warning: This action cannot be undone.
Action: Click the “Hard Delete” button/link.
What happens next: A confirmation message will pop up warning you that this is permanent. Click “Yes” only if you are absolutely sure.
4. Step 2: Basic Signup Details
Purpose
This screen allows you to enter the student’s personal and contact information. All fields marked with * are mandatory.
Step 2.1: Fill in Personal Details
Full Name *: Enter the student’s complete name.
Mobile No. *: Enter the student’s mobile number (e.g., 923001234567).
Email: Enter the student’s email address.
CNIC: Enter the student’s CNIC number (13 digits without dashes and spaces).
Password *: Create a password for the student’s account.
Step 2.2: Upload Student Picture
Click the “Choose File” button next to “Upload Picture”.
Select the student’s photograph from your computer.
Step 2.3: Save and Continue
After filling in all details, click the “Save & Continue” button.
What happens next: You will be taken to the Fee Structure screen.
5. Step 3: Fee Structure
Purpose
This screen allows you to configure the fee structure for the student. You can set admission fees, tuition fees, other fees, and apply discounts.
Step 3.1: View Fee Components
The table shows different fee components:
Fee Component
Prospectus Fees
Disc. (%)
Disc. (PKR)
Approved Fees
Admission Fee
15,000
0
0
0
Tuition Fees
0
0
0
0
Other Fee
0
0
0
0
Transport Charges
7,000
0
0
0
Step 3.2: Enter Fee Details
Prospectus Fees: The standard fee amount (auto-filled from the system).
Disc. (%): Enter any discount percentage to apply.
Disc. (PKR): Enter any discount amount in PKR to apply.
Approved Fees: The final fee after discount (auto-calculated).
Step 3.3: Save and Continue
After configuring all fees, click the “Save & Continue” button.
What happens next: You will be taken to the Payment Plan screen.
6. Step 4: Payment Plan
Purpose
This screen allows you to set up the payment plan for the student. You can configure lump-sum admission fee payment and create installment plans for tuition and other fees.
Step 4.1: Lumpsum Admission Fee
Admission Fee: The admission fee amount is displayed.
Due Date: Select the due date for the admission fee payment (format: mm/dd/yyyy).
Step 4.2: Installments – Tuition & Other Fees
Fee Head/Installment No.: Enter the fee head (e.g., “Tuition Fee”, “Transport fee”).
Due Date: Select the due date for each installment (format: mm/dd/yyyy).
Amount: Enter the amount for each installment.
Paid: Check this box if the installment has already been paid.
Action: Click the “Add” button to add each installment to the plan.
Step 4.3: View Added Installments
The table shows all installments added:
Fee Head/Installment No.: The fee head name.
Due Date: The due date for the installment.
Amount (PKR): The installment amount.
Action: Click to edit or delete the installment.
Step 4.4: Save and Continue
After configuring all installments, click the “Save & Continue” button.
What happens next: You will be taken to the Fee Summary screen where you can review and finalize the admission.
7. Step 5: Fee Summary
Purpose
This screen shows the complete fee summary for the student. You can review all fees, installments, and the total amount before finalizing the admission.
What to Review
Fee Structure: All configured fees are displayed.
Payment Plan: All installment schedules are listed.
Total Amount: The total amount payable by the student.
Finalize Admission
After reviewing all details, click the “Save & Continue” or “Submit” button.
What happens next: The student’s admission will be completed. The student will receive login credentials and can access the system.
8. Exporting Admission Data
Click the “Export to Excel” button at the bottom of the student list.
What happens next: A spreadsheet file will be downloaded containing all student admission data.
9. What to do next?
If you added a new student: The student will appear in the list with status “Documents Uploaded”. Click “Continue” to proceed with the admission process.
If you completed the admission: The student will receive login credentials and can access their account.
If you need to manage other admissions: Use the sidebar to navigate to other admission sections.
Tips:
1. The “Continue” button is the key to progress through the admission process step by step.
2. All fields marked with * are mandatory. Make sure they are filled correctly.
3. Fee structure and payment plans can be customized for each student based on their eligibility.
4. Always review the Fee Summary before finalizing the admission to avoid errors.
5. Before hard deleting a student, ensure no important data is associated with them.
User Guide: Student Requests
1. Purpose of this Screen
This screen allows you to view and manage student requests submitted through the evERP system. Students can submit requests related to fees, academics, section changes, and other administrative matters. From here, you can review each request, take action, and provide responses to students.
2. Step-by-Step Guide (How to Use This Screen)
Step 1: View the Student Requests List
The main table shows you all student requests with the following columns:
Sr. No.: The serial number of the request.
Roll Number: The roll number of the student who submitted the request.
Program: The program in which the student is enrolled.
Request: The description of the request (e.g., “Please correct my fee date”, “I want fee refund”, “Fee date extended”).
Action: This column shows the status and action taken on the request.
3. Managing Student Requests (The “Action” Column)
The Action column displays the status of each request. Depending on the request, you can see the following status indicators:
Accepted – OK
What it means: The student’s request has been accepted and processed.
Example: “Please correct my fee date” – The fee date was corrected successfully.
Rejected – Not Now
What it means: The student’s request has been rejected.
Example: “I want fee refund” – The refund request was not approved at this time.
Accepted – done
What it means: The student’s request has been accepted and completed.
Example: “Fee date extended” – The fee due date was successfully extended.
4. Common Student Request Types
Request Type
Description
Possible Action
Fee Correction
Student requests correction in fee details
Review and update fee record
Fee Refund
Student requests a refund of paid fees
Verify eligibility and process refund
Fee Date Extension
Student requests extension of fee due date
Extend due date if approved
Section Change
Student requests to change their section
Move student to new section if space available
Academic Issue
Student reports an academic problem
Investigate and resolve the issue
5. Exporting Student Request Data
Click the “Export to Excel” button at the bottom of the table.
What happens next: A spreadsheet file will be downloaded containing all student request data. This is useful for reporting, auditing, or tracking purposes.
6. What to do next?
If you see a pending request: Click on the request to view full details and take action (Accept, Reject, or Comment).
If you need to update a student’s record: Use the request details to make necessary changes in the relevant module.
If you want to communicate with the student: Respond to the request with a comment or notification.
Tips:
1. Always respond to student requests in a timely manner to maintain student satisfaction.
2. When rejecting a request, provide a clear reason so the student understands the decision.
3. For requests that require further action, make sure to update the student’s record after processing.
4. Export the requests list periodically to track trends and common student issues.
User Guide: Challan Status Management
1. Purpose of this Screen
This screen allows you to view and manage student challans (fee vouchers) in the evERP system. Challans are generated for various fee types including Admission Fee, Exam Fee, Tuition Fees, and Transport Charges. From here, you can track the status of all challans, view paid and unpaid challans, approve or reject payments, and manage student fee records.
2. Filtering Challans
Step 1: Select Filters
At the top of the page, you will see filter options to narrow down the challan list:
Select Faculty: Choose a faculty to view challans for that faculty only.
Select Program: Choose a program to view challans for that program only.
Select Semester: Choose a semester to view challans for that semester only.
Section: Select a specific section to view challans for that section only.
Course: Select a course to view challans for that course only.
Step 2: Get Data
After selecting filters, click the “Get Data” button to refresh the challan list.
What happens next: The table will update to show only challans matching your selected criteria.
3. Challan Status Tabs
The screen has four tabs to view different challan statuses:
All Challans: Shows all challans regardless of status.
Paid (Approved) Challans: Shows challans that have been paid and approved.
Paid (Unapproved) Challans: Shows challans that have been paid but not yet approved.
Not Yet Due Challans: Shows challans whose due date has not yet arrived.
4. Tab 1: All Challans
Purpose
This tab displays all challans for all students regardless of status.
Table Columns
Student Name (Roll No): The student’s name and roll number.
Fee Head: The type of fee (e.g., Admission, Exam Fee, Tuition Fees).
Amount (PKR): The fee amount.
Fine (PKR): Any late payment fine applied.
Status: The payment status (e.g., Unpaid, Paid).
Due Date: The date by which the fee must be paid.
Actions: Buttons to manage the challan:
Edit: Edit the challan details.
View: View the challan details.
Delete: Delete the challan.
5. Tab 2: Paid (Approved) Challans
Purpose
This tab displays challans that have been paid and approved by the accounts department.
Table Columns
Fee Head: The type of fee (e.g., Admission Fee, Exam Fee).
Amount (PKR): The fee amount.
Fine (PKR): Any late payment fine applied.
Status: Shows “Paid” as the status.
Actions: Click “View” to see the paid challan details.
6. Tab 3: Paid (Unapproved) Challans
Purpose
This tab displays challans that have been paid but not yet approved by the accounts department. These need your review and approval.
Table Columns
Fee Head: The type of fee.
Amount (PKR): The fee amount.
Fine (PKR): Any late payment fine applied.
Status: Shows “Unpaid” until approved.
Due Date: The original due date.
Uploaded (By Student): Click “View” to see the challan uploaded by the student.
Actions: Click “View” or “Edit” to review and approve the challan.
Step-by-Step: Approve a Paid Challan
Look at the “Uploaded (By Student)” column and click “View” to see the uploaded challan.
Verify that the payment details are correct.
In the “Actions” column, click “Edit”.
Change the status from “Unpaid” to “Paid”.
Click “Save” to approve the challan.
The challan will now move to the “Paid (Approved) Challans” list.
7. Tab 4: Not Yet Due Challans
Purpose
This tab displays challans whose due date has not yet arrived. These are future fee payments.
Table Columns
Student Name (Roll No): The student’s name and roll number.
Fee Head: The type of fee (e.g., Tuition Fees, Transport Charges).
Amount (PKR): The fee amount.
Status: Shows “Unpaid” as the status.
Due Date: The future due date.
Actions: Checkbox to select the challan for future payment processing.
8. Exporting Challan Data
Click the “Export to Excel” button at the bottom of any challan list.
What happens next: A spreadsheet file will be downloaded containing all challan data for the current view.
9. What to do next?
If you need to approve a paid challan: Go to “Paid (Unapproved) Challans”, review the uploaded challan, and approve it.
If you need to track defaulters: Use the “Fee Defaulters” section in the sidebar.
If you need to allocate sections: Use the “Section Allocation” section in the sidebar.
Tips:
1. Always verify the uploaded challan document before approving a payment.
2. Use filters (Faculty, Program, Semester) to narrow down challans and find specific records quickly.
3. “Paid (Unapproved) Challans” requires your immediate attention to avoid delays in student fee records.
4. “Not Yet Due Challans” helps you plan ahead for upcoming fee collections.
User Guide: Fee Defaulters
1. Purpose of this Screen
This screen allows you to view and manage students who have defaulted on fee payments in the evERP system. Fee defaulters are students whose fees are overdue and unpaid. From here, you can track all defaulters, view the amount owed, including any late payment fines, and take appropriate action to collect outstanding fees.
2. Step-by-Step Guide (How to Use This Screen)
Step 1: View the Fee Defaulters List
The main table shows you all fee defaulters with the following columns:
Student Name (Roll No): The name and roll number of the defaulter student.
Fee Head: The type of fee (e.g., Tuition Fee, Transport Charges).
Amount (PKR): The outstanding fee amount.
Fine (PKR): Any late payment fine applied to the overdue fee.
Status: Shows “Unpaid” as the status.
Due Date: The original due date by which the fee should have been paid.
Actions: Checkbox to select the defaulter for further action.
3. Understanding Fee Defaulters
Who are Fee Defaulters?
Students whose fee due date has passed without payment.
Students with outstanding fee amounts that are overdue.
Students who have accumulated late payment fines.
Common Fee Heads for Defaulters
Fee Head
Typical Amount (PKR)
Typical Fine (PKR)
Tuition Fee
25,000
230
Transport Charges
5,000
170
4. Actions to Take with Fee Defaulters
Send Reminder Notifications
Send automated email or SMS reminders to defaulters.
Notify students about their overdue fees and outstanding amounts.
Apply Late Payment Fines
Fines are automatically calculated based on the number of days overdue.
Review and adjust fines if necessary.
Generate Defaulters Report
Export the list of defaulters for reporting purposes.
Share with management or accounts department.
Restrict System Access
If configured, defaulters may have restricted access to the system.
Block exam registration or result viewing until fees are cleared.
Mark as Resolved
Once the student pays the outstanding fees, mark the record as resolved.
The student will be removed from the defaulter list.
5. Exporting Fee Defaulter Data
Click the “Export to Excel” button at the bottom of the table.
What happens next: A spreadsheet file will be downloaded containing all fee defaulter data. This is useful for reporting, auditing, and follow-up purposes.
6. What to do next?
If you need to contact defaulters: Use the communication module to send reminders.
If you need to generate reports: Export the defaulter list and share with management.
If a student has paid: Update the fee record to mark it as paid.
Tips:
1. Regularly review the fee defaulters list to keep track of overdue payments.
2. Send timely reminders to defaulters before the due date to prevent accumulation of fines.
3. The fine amount increases the longer a fee remains unpaid.
4. Use the “Actions” checkbox to select multiple defaulters for batch processing.
5. Keep records of all communications with defaulters for audit purposes.
User Guide: Section Allocation
1. Purpose of this Screen
This screen allows you to allocate sections to students in the evERP system. Section allocation is the process of assigning students to specific class sections (e.g., Section A, Section B) for a particular course and semester. This ensures that students are properly enrolled in their classes and teachers can manage their rosters effectively.
2. Section Allocation Main Screen – How to Use
Step 1: Find a Specific Student (Search)
At the top right of the table, you will see a “Search” box.
Action: Type any keyword (like student name, email, or role) into this box and press Enter. The table will automatically filter to show only matching students.
Step 2: Change How Many Students You See
Next to the Search box, you will see a dropdown that says “Show Entries: 10”.
Action: Click this dropdown and select a number (e.g., 25, 50, or 100). This controls how many students are displayed on one page.
Step 3: View the Student List
The main table shows you all students awaiting section allocation with the following columns:
Sr. No.: The serial number of the student.
Full Name: The student’s complete name.
Role: The student’s role (e.g., Student).
Email: The student’s email address.
Action: Click the “Allocate” button to assign a section to the student.
4. Allocating a Section to a Student
Step 1: Click Allocate
In the main table, look at the “Action” column for the student you want to allocate.
Action: Click the “Allocate” button.
What happens next: The Allocate Section screen will open.
Step 2: Review the Student Information
The screen will display the student’s Roll Number for identification.
Step 3: Select Section
Look for the “Section” dropdown field.
Action: Select the section you want to allocate to the student from the dropdown.
Step 4: Enter Registration Number
Look for the “Registration Number *” field.
Action: Enter the student’s registration number (if applicable).
Step 5: Save the Allocation
Action: Click the “Save” or “Allocate” button.
What happens next: The student will be allocated to the selected section. The student will now appear in that section’s roster.
5. Exporting Section Allocation Data
Click the “Export to Excel” button at the bottom of the student list.
What happens next: A spreadsheet file will be downloaded containing all student data for section allocation.
6. What to do next?
If you allocated a section: The student is now enrolled in that section. They will appear in the section’s student list.
If you need to allocate more students: Continue allocating sections to other students in the list.
If you want to view section rosters: Navigate to the Sections screen to view the complete student list for each section.
Tips:
1. Section allocation should be completed before the start of the semester.
2. Ensure sections have enough capacity before allocating students.
3. The registration number is an important identifier—enter it correctly.
4. Once allocated, students will be able to view their class schedule and access course materials.
User Guide: Timetable Management
1. Purpose of this Screen
This screen allows you to manage class timetables for courses and sections in the evERP system. Timetables define the schedule of classes, including the day, start time, end time, and teacher assigned to each section. From here, you can create new timetables, view existing schedules, and update class timings.
2. Timetable Main Screen – How to Use
Step 1: Find a Specific Timetable (Search)
At the top right of the table, you will see a “Search” box.
Action: Type any keyword (like program name, course name, or section name) into this box and press Enter. The table will automatically filter to show only matching timetables.
Step 2: Change How Many Timetables You See
Next to the Search box, you will see a dropdown that says “Show Entries: 10”.
Action: Click this dropdown and select a number (e.g., 25, 50, or 100). This controls how many timetables are displayed on one page.
Step 3: View the Timetable List
The main table shows you all timetables with the following columns:
Sr. No.: The serial number of the timetable.
Program/Degree Name: The program to which the course belongs.
Semester Name: The semester in which the course is offered.
Course Name: The name of the course.
Section: The section name.
Action: This column contains a dropdown with options to manage each timetable.
4. Managing Timetables (The “Action” Column)
To manage a timetable, look at the “Action” column and click the appropriate option:
View Timetable
What it does: Allows you to see the complete timetable for a course section.
Action: Click the “View Timetable” option.
What happens next: The Timetable Details screen will open showing the weekly schedule.
Update Timetable
What it does: Allows you to edit the timetable details.
Action: Click the “Update Timetable” option.
What happens next: The Add Timetable screen will open with existing details for editing.
Soft Delete
What it does: This hides the timetable from the main list. It is not permanently removed.
Action: Click the “Soft Delete” option.
What happens next: A confirmation message will pop up. Click “Yes” to confirm.
Hard Delete
What it does: This permanently removes the timetable from the system. Warning: This action cannot be undone.
Action: Click the “Hard Delete” option.
What happens next: A confirmation message will pop up warning you that this is permanent. Click “Yes” only if you are absolutely sure.
5. Adding a New Timetable
Step 1: Click Add Timetable
Look for the “Add Timetable” button at the top of the page.
Action: Click the “Add Timetable” button.
Step 2: Select Course Details
Faculty *: Select the faculty offering the course (e.g., Faculty of Humanities & Social Sciences).
Program/Degree *: Select the program to which the course belongs.
Semester Name *: Select the semester in which the course is offered.
Course Name *: Select the course for which you want to create a timetable.
Step 3: Set Class Schedule
For each day of the week, enter the class timings:
Monday: Set Start Time and End Time (e.g., 08:00 AM to 09:00 AM).
Tuesday: Set Start Time and End Time (e.g., 08:00 AM to 09:00 AM).
Wednesday: Set Start Time and End Time (e.g., 07:00 AM to 08:00 AM).
Thursday: Set Start Time and End Time.
Friday: Set Start Time and End Time.
Saturday: Set Start Time and End Time.
Sunday: Set Start Time and End Time.
Step 4: Set Live Class Option
For each day, check the “Live” box if the class is a live online session.
Step 5: Save the Timetable
Action: Click the “Add” button to save the timetable.
What happens next: The timetable will be saved and will appear in the timetable list. Students will be able to see their class schedule.
6. View Timetable Details Screen
Purpose
This screen displays the weekly class schedule for a specific course section.
Information Displayed
The table shows the schedule with the following columns:
Course/Section: The course name and section (e.g., Introduction to ICT / BSCS ICT Sec A).
Monday: Class time on Monday (e.g., 08:00 AM – 09:00 AM).
Tuesday: Class time on Tuesday (e.g., 08:00 AM – 09:00 AM).
Wednesday: Class time on Wednesday (e.g., 07:00 AM – 08:00 AM).
Thursday: Class time on Thursday (e.g., —).
Friday: Class time on Friday (e.g., —).
Saturday: Class time on Saturday (e.g., —).
Sunday: Class time on Sunday (e.g., —).
Teacher: The teacher assigned to this section.
7. What to do next?
If you added a timetable: The schedule will be visible to students and teachers.
If you updated a timetable: The changes will be reflected immediately in student and teacher schedules.
If you want to view other timetables: Use the search or filter options to find specific schedules.
Tips:
1. Ensure class timings do not overlap for the same teacher or section.
2. Use the “Live” checkbox to indicate online sessions for remote learning.
3. Timetables should be created before the start of the semester.
4. Different sections of the same course can have different timetables.
User Guide: Personal Planner
1. Purpose of this Screen
This screen allows you to manage personal events and reminders in the evERP system. The Personal Planner is your individual calendar where you can add, view, and manage your own events, tasks, and reminders. This helps you stay organized and keep track of important deadlines, meetings, and personal commitments.
2. Personal Planner Main Screen – How to Use
Step 1: View the Calendar
The main screen displays a monthly calendar view showing the current month (e.g., JUNE 2026).
The calendar shows all days of the month with dates.
Days with events may be highlighted or marked.
Step 2: Navigate Between Months
Look for navigation arrows or controls to switch between months.
Action: Click the Previous or Next buttons to view other months.
3. Events List – How to Use
Step 1: Search for Events
At the top of the page, you will see a “Search events” box.
Action: Type any keyword (like event title) into this box and press Enter.
Step 2: Filter Events by Date Range
You can filter events by date range:
Start Date: Select the start date (mm/dd/yyyy).
End Date: Select the end date (mm/dd/yyyy).
Action: Click the “Filter” button to apply the date filter.
Action: Click the “Reset” button to clear all filters.
Step 3: View the Events List
The table shows all events with the following columns:
Sr. No.: The serial number of the event.
Title: The title/name of the event (e.g., “moharam”).
Duration: The date and time range of the event (e.g., “25-Jun-26 11:14 AM to 26-Jun-26 11:14 AM”).
Action: Contains buttons to manage each event.
4. Adding a New Event/Reminder
Step 1: Click Add Events/Reminders
Look for the “Add Events/Reminders” button at the top of the page.
Action: Click the “Add Events/Reminders” button.
Step 2: Enter Event Details
Title: Enter the title of the event (e.g., “moharam”).
Step 3: Select Event Type
Choose the type of event from the dropdown options:
Event: For regular events.
Personal Planning: For personal planning tasks.
Academic Calendar: For academic-related events.
Modules: For module-related events.
Topics: For topic-related events.
OCW: For Open Course Warehouse events.
Learning Resources: For learning resource events.
Live Class: For live class schedules.
Discussion Board: For discussion board events.
Discussion Forums: For discussion forum events.
Course Progress Report: For progress report events.
Course Folders: For course folder events.
Carry Forward: For carry forward-related events.
Step 4: Set Start and End Date/Time
Start Date: Select the start date and time (mm/dd/yyyy –:–).
End Date: Select the end date and time (mm/dd/yyyy –:–).
Step 5: Save the Event
Action: Click the “Add Event” button to save the event.
What happens next: The event will be saved and will appear in your calendar and events list.
5. Managing Events (The “Action” Column)
To manage an event, look at the “Action” column and click the appropriate option:
View
What it does: Allows you to see full details of the event.
Action: Click the “View” button/link.
Edit
What it does: Allows you to edit the event details.
Action: Click the “Edit” button/link.
Delete
What it does: Allows you to delete the event.
Action: Click the “Delete” button/link.
What happens next: A confirmation message will pop up. Click “Yes” to confirm.
6. What to do next?
If you added an event: The event will appear in your calendar and events list.
If you need to filter events: Use the date range filter to view events for specific periods.
If you need to manage other academic items: Use the sidebar to navigate to Personal Planning, Academic Calendar, Modules, Topics, OCW, Learning Resources, Live Class, Discussion Board, Discussion Forums, Course Progress Report, or Course Folders.
Tips:
1. Use the Personal Planner to keep track of all your important deadlines and commitments.
2. Select the appropriate event type to categorize your events for better organization.
3. Use the date filter to view events for specific time periods.
4. Set reminders for important events so you don’t miss deadlines.
User Guide: Academic Calendar Management
1. Purpose of this Screen
This screen allows you to manage academic calendars for different academic years in the evERP system. The academic calendar contains important dates, holidays, semester schedules, and university events for each academic year. From here, you can upload, view, and manage academic calendar files for students and staff.
2. Academic Calendar Main Screen – How to Use
Step 1: Find a Specific Academic Calendar (Search)
At the top right of the table, you will see a “Search” box.
Action: Type any keyword (like year) into this box and press Enter. The table will automatically filter to show only matching academic calendars.
Step 2: Change How Many Calendars You See
Next to the Search box, you will see a dropdown that says “Show Entries: 10”.
Action: Click this dropdown and select a number (e.g., 25, 50, or 100). This controls how many academic calendars are displayed on one page.
Step 3: View the Academic Calendar List
The main table shows you all academic calendars with the following columns:
Sr. No.: The serial number of the academic calendar.
Year: The academic year (e.g., 2025, 2026, 2027).
Action: This column contains buttons to manage each academic calendar.
4. Managing Academic Calendars (The “Action” Column)
To manage an academic calendar, look at the “Action” column and click the appropriate option:
View Academic Calendar
What it does: Allows you to view the uploaded academic calendar file.
Action: Click the “View Academic Calendar” button/link.
What happens next: The View Academic Calendar screen will open showing the calendar details.
Update Academic Calendar
What it does: Allows you to edit the academic calendar details or upload a new file.
Action: Click the “Update Academic Calendar” button/link.
What happens next: You will be taken to an edit form where you can make changes. Click “Save” to confirm.
Soft Delete
What it does: This hides the academic calendar from the main list. It is not permanently removed.
Action: Click the “Soft Delete” button/link.
What happens next: A confirmation message will pop up. Click “Yes” to confirm.
Hard Delete
What it does: This permanently removes the academic calendar from the system. Warning: This action cannot be undone.
Action: Click the “Hard Delete” button/link.
What happens next: A confirmation message will pop up warning you that this is permanent. Click “Yes” only if you are absolutely sure.
5. Adding a New Academic Calendar
Step 1: Click Add Academic Calendar
Look for the “Add Academic Calendar” button at the top of the page.
Action: Click the “Add Academic Calendar” button.
Step 2: Select Year
Look for the “Year *” dropdown field.
Action: Select the academic year from the dropdown (e.g., 2023, 2024, 2025).
Step 3: Enter File Name
Look for the “File 1 *” field.
Action: Enter the name of the calendar file (e.g., “Academic Calendar”).
Step 4: Upload Calendar File
Click the “Choose File” button next to the file field.
Select the academic calendar file from your computer.
Step 5: Save the Academic Calendar
Action: Click the “Add Academic Calendar” button.
What happens next: The academic calendar will be saved and will appear in the calendar list.
6. View Academic Calendar Screen
Purpose
This screen displays the uploaded academic calendar for a specific year.
Information Displayed
The table shows the following columns:
Year: The academic year (e.g., 2025).
File Name: The name of the uploaded file (e.g., “Academic Calendar”).
Action: Click “View” to open and view the calendar file.
7. What to do next?
If you added an academic calendar: The calendar will appear in the list and be available for students and staff to view.
If you viewed an academic calendar: You can review all important dates and events for that academic year.
If you want to manage other academic items: Use the sidebar to navigate to other sections like Personal Planning, Modules, Topics, etc.
Tips:
1. Academic calendars should be uploaded before the start of each academic year.
2. Use a consistent naming convention for calendar files (e.g., “Academic_Calendar_2026.pdf”).
3. Ensure the calendar file is in a common format like PDF for easy viewing.
4. Before deleting a calendar, ensure no one is currently viewing it. Use “Soft Delete” first to be safe.